 Quite often people ask me how to handle XML files where the author has written guidance notes as a tag in the XML. These guidance notes should not be translated so you don’t really want to see them presented as a translatable segment as you work, but you would like them to be clearly visible as a reference for the translator to help clarify meaning or give guidance on the maximum number of characters allowed for each segment when this could vary throughout the file for example.
One of the ways this used to be handled in the “olden days” was by creating a special ini file that TagEditor could use to ensure that the text containing the guidance was visible within a tag but not as translatable text… so something like this where you can see the comment explaining what “coots” and “herns” are:
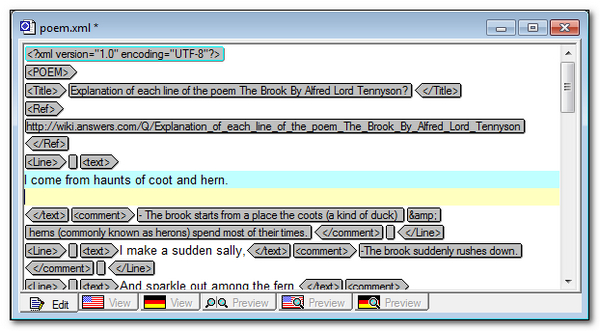
If you open the same file in Studio you have much cleaner view but of course you can’t see the comments. You can’t see them if you open the file saved as a TTX, and you can’t see them if you create a new filetype for the original XML and only extract the translatable text.
But all is not lost… and the solution is even better! Studio can preview XML files out of the box so you have an idea about what’s in the file as you work. So if I create a new filetype for this file and preview it I can see the translatable text on the left in the source column of the Studio Editor, and the Preview of the file is on the right in the Preview Window that I have positioned here for convenience:
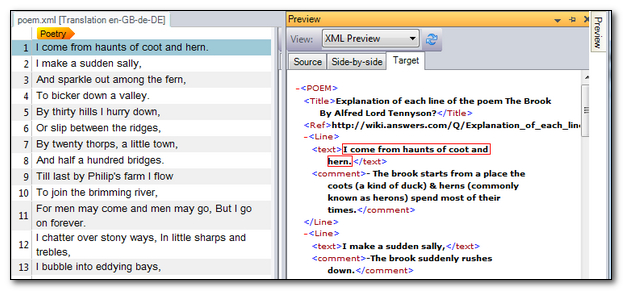
This isn’t too bad… but this is quite a clean XML that I created myself by using the text from a website explaining what this poem means. In practice many XML files have a lot more nontranslatable text and the default preview here would be pretty messy. Wouldn’t it be nicer for the Translator if the preview looked more like this for example:
I added the picture for fun, but you can see that the preview now provides much better context for the Translator because the translatable text is in the column on the left, line by line and the comments providing guidance are nicely added to the column on the right in a different format providing an easy method clearly seeing what needs to be reviewed as you work. The preview is also real-time so as you translate the text can be refreshed (Ctrl+R) to show the translated text as you go.
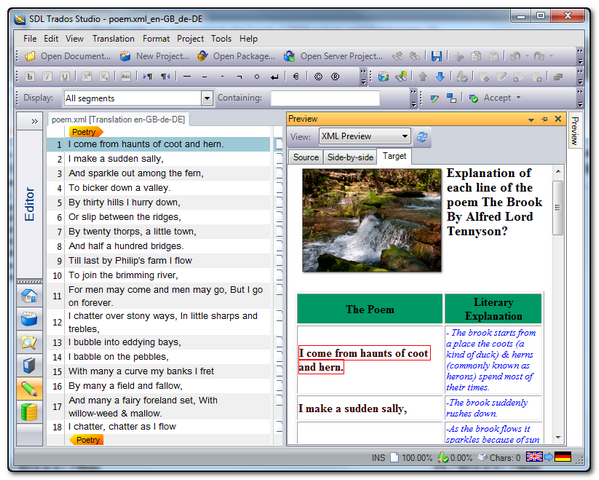
And if you have a separate screen you can move the preview window onto your other screen providing a permanent, real-time preview of the work you are doing which would give you room for the simple preview as shown below or a side by side preview where you could display the source layout on the left and the target as you worked on the right:

So, how do you do this and do you need to be a rocket scientist? Well, fortunately if you wish to create a simple stylesheet it’s really not that hard. Until this week I had never actually created one myself from scratch, but in order to help someone with this issue of not being able to see comments that were included in tags I decided to have a go. To get started I used the XSLT Tutorial provided free of charge by W3Schools.
What I learned from this was that the basics for displaying only the things you needed are actually very simple to do. I’ve no doubt a web developer could do fantastic things with this feature in Studio but I also think it’s reasonably accessible to anyone. To help you get the idea I have zipped up several files and placed them here – Paul’s Zip file. The zip contains the following:
- poem.xml (the xml file you’ll translate)
- stylesheet.xsl (the simple stylesheet I created)
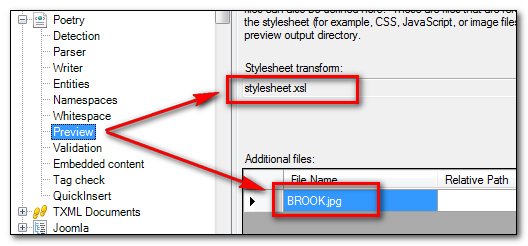
- BROOK.jpg (the pretty image… not necessary, but pleasing to the eye)
- poetry.sdlftsettings (my filetype)
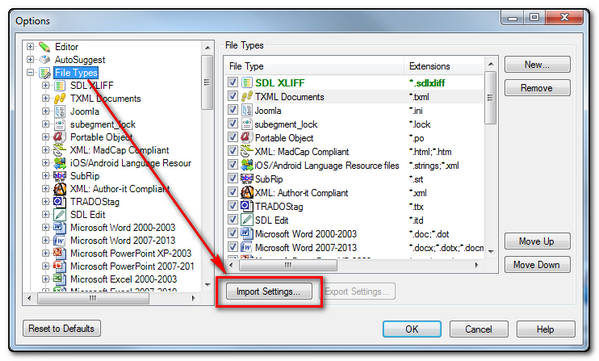
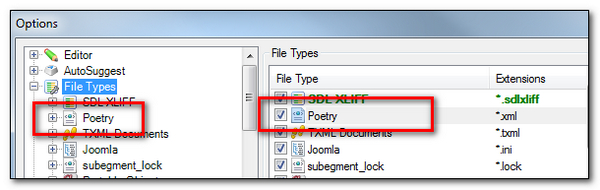
All you need to do to test these files is click on the link above, download the zip and unzip it to a folder somewhere on your computer. Once you’ve done this just add the filetype I created to Studio by going to Tools -> Options -> Filetypes and then click on Import Settings:
You select poetry.sdlftsettings from the files in your new folder and Studio will give you a short message telling you that these settings are for a new filetype and asking you whether you would like it to be created. So click on Yes and you should be told that the settings were successfully imported. You should now see a view something like this with your new filetype added:
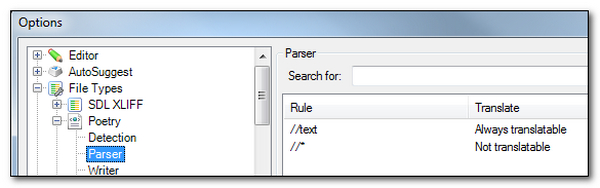
If you open up the Poetry filetype by clicking on the plus symbol on the left you can check out the settings I used. So the Parser rules show how I created two simple rules to extract only the text I wanted.. in this case //text gets me the translatable text from the XML file and presents it in the Editor when I open for translation, and //* with “Not translatable” just means don’t show me anything else in the Editor:
But you probably know about that stuff already… so the interesting part is how to get the style. To do this if you look in the Preview node I have added my stylesheet and a file containing the image I used for fun:
If I close the options now and open the XML file in the zip for translation and then generate a preview you should see the preview as shown above.
The creation of the stylesheet itself is not based on an SDL specific skillset. It is pure XSLT and I created this one using the basics of the tutorial at W3Schools as mentioned earlier. So if you open the stylesheet.xsl file in a text editor, I use EditPad Pro for this but most text editors should be fine then I’ll explain the basics of the file so you can see how I managed to do this… it’s really not as tricky as you think and you don’t have to understand a lot to get this far.
The first thing I learned is that every stylesheet must have a declaration. Conveniently I just copied this straight out of the tutorial:
<xsl:stylesheet version="1.0"
xmlns:xsl="http://www.w3.org/1999/XSL/Transform">
I then learned that because a stylesheet is an XML document that it must also start with an XML declaration too. So I copied that one too:
<?xml version="1.0" encoding="ISO-8859-1"?>
<xsl:stylesheet version="1.0"
xmlns:xsl="http://www.w3.org/1999/XSL/Transform">
Easy so far! The tutorial then provided an example of a template you can use for many stylesheets. I amended the content to suit the names of the elements in my XML like this:
<xsl:template match="/">
 <html>
  <body>
  <table border="1">
    <tr bgcolor="#009966">
      <th>The Poem</th>
      <th>Literary Explanation</th>
    </tr>
    <tr>
      <td>.</td>
      <td>.</td></td>
    </tr>
  </table>
  </body>
 </html>
</xsl:template>
So even blindly following the tutorial I have a structure that will give me two columns inside a table. But for a full explanation you should read the tutorial… it is really good and explains each part of this code really well.
The final part was to be able to select information within elements, or tags, from the XML, and then put this part where the dot is in <td>.</td>.
<xsl:for-each select="POEM/Line">
  <tr>
    <td><xsl:value-of select="text"/></td>
    <td><xsl:value-of select="comment"/></td>
  </tr>
</xsl:for-each>
I get the names of the elements for this part from the XML file itself. So if I open the XML file in my editor and take a quick look I can see the structure, or path, to the information I want is like this… and it’s really just like the paths for your files in Windows Explorer… just a different way of thinking about it:
<POEM><Line><text>
or
<POEM><Line><comment>
So the first statement select=”POEM/Line” is just saying look at all the information in the file in the Line folder. The next two are saying select the “text” and the “comment” information from the “text” and “comment” files that are in the “Line” folder.
Now I appreciate this may well be flying over the heads of many readers, and to be honest it does mine to some extent. But reading these parts of the tutorial really helped me to put it all together and it genuinely only took me 30 minutes to do. Once I had this I was able to preview the translatable text and the comments in a nice clear way… my file now looking like this:
<?xml version="1.0" encoding="ISO-8859-1"?>
<xsl:stylesheet version="1.0"
xmlns:xsl="http://www.w3.org/1999/XSL/Transform">
<xsl:template match="/">
  <html>
    <body>
      <table border="1">
        <tr bgcolor="#009966">
          <th>The Poem</th>
          <th>Literary Explanation</th>
        </tr>
        <xsl:for-each select="POEM/Line">
        <tr>
          <td><xsl:value-of select="text"/></td>
          <td><xsl:value-of select="comment"/></td>
        </tr>
        </xsl:for-each>
      </table>
    </body>
  </html>
</xsl:template>
</xsl:stylesheet>
Once you have this framework you might find that you can reuse this stylesheet with a little editing each time to create better previews to help you work when translating XML files just in case your Client didn’t do this for you. The final version I used for this article is a little different because I added to the stylesheet to make it look a little prettier, but the basics are all above.
So I hope this will not be too technically off putting… given how technical all Translators using CAT tools have to be today just to understand tags and how to handle all the different kinds of file formats, translation memories, termbases etc. I reckon you can do it if you put your mind to it! So translate in style 😉
This is getting boring, once again I cannot start the comment in a different way than saying “great job, Paul”. Great job, Paul…
For other people interested in using XSL/CSS in Studio, I would also like to suggest checking out the following webinar recording:
http://www.translationzone.com/en/resources/downloads/webinar-recordings/2010-12-13-xml-localization-for-advanced-studio-users.asp
Thanks Agenor… for a second I thought you were really bored! Thanks for the link, Ziad does an excellent job on these.
Hi Paul,
I would like to check out the webinar the user Agenor referred to. When I click the link I get the message “Oh no…it’s gone! We are very sorry, but this URL is not available…”.
Does this link work when you click on it?
It would be great if you could help me get access to this webinar.
I also want to thank you for the many useful Information and tips I got from your blog over the last years.
Monika
Hi Monika,
I checked all 91 webinars that are available in the new SDL Trados site and this one doesn’t seem to be available anymore. I guess it’s too old. However, this was a really useful webinar so I’ll speak with the team and see whether it can still be recovered from somewhere.
Glad you find the blog useful 🙂
What happened to the tern? I love the explanation of ‘hern’!
A misspelling? I’ve read that a tern,being a sea bird, is unlikely to inhabit a brook 😉
Gosh! there’s more to this than meets the eye. You are obviously right. I think I learnt it as tern, but maybe there was a typo in my schoolbook, or maybe I misremembered.
Whatever the reason it’s a beautiful poem… and the explanation of the stylesheets is the same whichever the correct terminology 😉
Yes, of course it’s the same – and great blog.
I would like to add, however, that I don’t think the haunts of coot and tern are upstream like that – just ask the coots in the local park here! I think he was doing it for the rhyme.
Hi Margaret, I’d have to ask David Attenborough… but I guess a little poetic license is acceptable here 🙂
Do you know how to change the previews of XML files that are downloaded as a package from WorldServer to Trados? There must be a way of modifying their output, but currently it seems the xliff being translate in bilingual view gets processed into the XML which is then previewed by Trados modifying the XML to an HTML which is viewed in the viewer. I am sure you can do it with the File Type API that exists, but I wasn’t going to delve into that if I don’t need to.
Hello Jesper,
If you download a package from WS then you are now previewing XLF files and not XML files as they will have been converted already. So if you want a sensible preview to match the XML layout then you would need a custom filetype with a preview created specifically for the xml files you are handling in WS. Most likely it would be inappropriate for XLF files created from other formats. So whether it would b e worth your effort or not depends on how many you have to handle I think.
Paul