 Studio has some excellent capabilities for getting more from your file types, and I’m often surprised by the reaction of Studio users when they find out what’s possible.
It seems we’ve been keeping a big secret that nobody was supposed to know… so I thought it would be worth taking a quick look at just one file type, everyones favourite, Microsoft Word. The mechanism for finding these options in any filetype and seeing how they can benefit you will be the same as it is for Microsoft Word… and just as simple. It’s a long post but hopefully useful.
To begin with you need to know where the options are, and you’ll find these in File -> Options -> File Types (Alt+f, t if you’re using Studio 2014 with the new ribbon). This will present you with a list of file types similar to this, all of which have their own specific options.
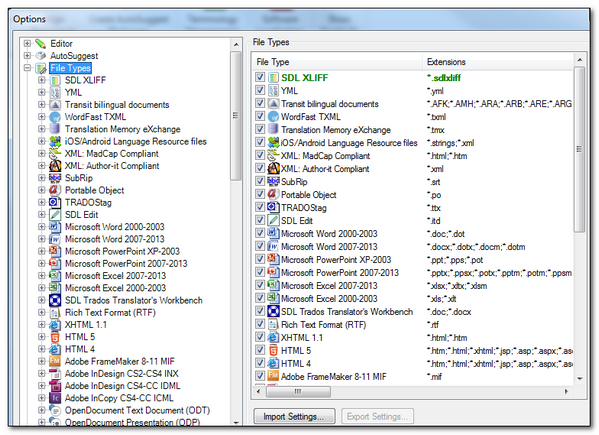
Don’t be put off, or overwhelmed by this, and don’t worry if I have different file types to you as I have a few custom file types in there and some downloaded from the SDL OpenExchange (now RWS AppStore). Just find the file type you’re interested in and click on the little plus symbol on the left, so in this case Microsoft Word, and we’ll look at the 2007-2013 variety as this is DOCX and more relevant these days.
Styles
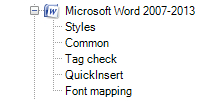
The options that are available for changing are not exactly the same in each file type but there are similarities. So Styles for example are an option in the Word 2000-2003, Rich Text Format (RTF), Adobe Framemaker 8-11 MIF, Open Document Text Document (ODT) and PDF file types. This option is there so you can define a text style that is applied to text that should be excluded from the translation. So the options are convert to an inline tag or to a structure tag. Inline just means that you will see the word as a tag in Studio and will have the opportunity to decide where it is placed in the target segment. So this might be used for non-translatable product names, or chemical formulae, for example to ensure they are not changed when working on the translation… like this:

To achieve this I simply created a character based style in MSWord called productname, applied this style to the product name in the text and then added productname as an inline style in Studio like this:
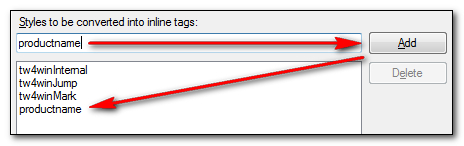
A really nice feature of Studio is that it’s possible to see the text inside the tag so it can be handled easily and will never be changed by mistake during the translation. And of course you can search for your brand names in MSWord and automatically apply this style to them using the replace feature.
Structure means that words that have this style applied to them will be moved out of the translation altogether. Obviously if they are in the middle of a sentence this won’t happen and they will appear as inline tags, but when applied to a whole sentence, or table cells for example, they will be moved out of the translation and you won’t have to deal with them at all. This also has the important advantage of any externally tagged segments not being included in the word count for the analysis.
Common
These settings can also be found across many file types. I think they are called common because they represent settings that are common to other file types in the same family. So Office files will have similar settings, Adobe products will have similar settings… but in practice this is probably irrelevant because you still have to set these for each file type you are working with. I’m just going to cover three of the features in the Common settings for this file type but I’d encourage you to take a look at them all and if you have any questions post them at the end of this article. The features I’m covering are Extract Hyperlinks, Track changes extraction mode and Extract comments as I think these are all features you could make more of once you see how they can be applied.
Extract hyperlinks
The handling of hyperlinks in Studio is quite sophisticated and provides you with a number of options that allow you to have the hyperlinks automatically handled and not included in the wordcount, or allow you to change them as part of your translation project. They work like this:
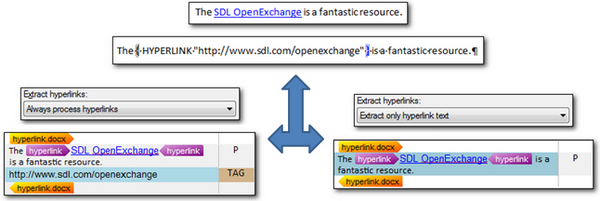
I have a sentence in MSWord with a single hyperlink which you can see when I display the field codes in Word. If I use the option to Always process hyperlinks then the translatable text and the link itself is extracted. You can see from the Tag ID in the right hand Document Structure Information column that this is a tag so you can make the conscious decision to copy source to target or not… although in practice Studio will auto-localise this during a pre-translation anyway. But if you don’t wish to localise it then the option to Extract only hyperlink text would be better so you don’t have to handle it at all, and more importantly it won’t be needlessly included in the word count.
There is a third option called Never process hyperlinks but in practice this behaves in the same way as Extract only hyperlink text despite what it says in the online help. So the two options discussed above are the relevant and useful ones. I think a later version of the options will rationalise the choices a little.
Track changes extraction mode
Track changes can be handled in any file type Studio supports for translation and review. But this MSWord file type has a special ability to allow you more. The handling of track changes is discussed in more detail in another article in this blog called “Making use of the Studio Track Changes features” so I won’t add anything more here other than to show what the different settings do when you open a file containing tracked changes in Studio. I used this single sentence that I translated and confirmed into my Translation Memory prior to editing the document in MSWord using Tracked Changes:

I guess the most common message you might have seen is this one if you use the default Ignore documents with pending changes:
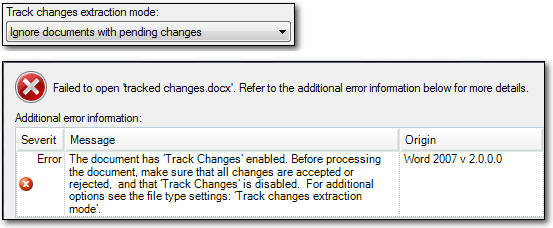
It’s also a pretty common error message to get if you were using earlier versions of Studio that didn’t have these options at all. The reason for it is deliberate because the software is assuming that you won’t want to unwittingly translate a document that has not been finalised by your client. So you have the opportunity to either reject or accept the changes before translating the file. This is clearly important because until Studio 2011 you had no way of being able to translate the track changes themselves.
The problem of course is when you opened the Word document, accepted all the changes, and it still wouldn’t open because it says there are tracked changes in the file! At this point you may have felt like throwing your laptop out the window in frustration (sadly these type of things have this effect on me!) but there is a workaround. The problem is caused because there is a flag in the underlying Word file that identifies whether there are tracked changes in the file or not and sometimes this flag is not cleared properly by MSWord. Studio, and SDL Trados 2007 look for this flag, and report the status accordingly… very frustrating. The flag looks something like this:
style='mso-prop-change:"Some text in here" 20071130T1052'"
There is a Knowledgebase article here, KB Article #3253, that explains how to deal with this, including how to remove the unwanted properties in the file if necessary.
Fortunately, since Studio 2011, we don’t need to resort to this anymore because you have two other options to consider that allow you to open the file for translation whether there are visible tracked changes or not. First of all there’s this one… Apply changes before opening:
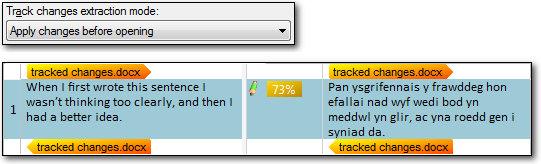
Using this option I see a 73% match against the original translation and the source text used shows the sentence with all changes accepted. The Translation Memory results window of course shows me the differences in the normal way.
This mode has the added benefit of helping you deal with the error message above when you are certain there are no tracked changes in the file and it still won’t open. So you can simply select this mode, safe in the knowledge that there won’t be any changes as it’s only the underlying property fooling Studio into thinking there are tracked changes present.
The third option, Display pending changes, will present the segment like this in the Studio Editor:

This in turn allows you to handle the translation using tracked changes as well and then your client can use the target translation in MSWord to make their own minds up about the final translation. So you could do something like this for example (excuse the actual translation as this is entirely based on Google):
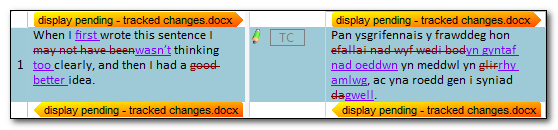
I already have a Translation Unit in my Translation Memory for the original translation and this is why you see the TC icon in the middle column. Points to note from this exercise are these:
- The TC (Tracked Changes) indicator becomes transparent because I have edited the draft suggestion from the Translation Memory
- I can toggle the view as I translate (default is Ctrl+Alt+Shift+F9 and this is of course customisable, or you can just click on the ribbon icon) so I don’t have to see these tracked changes… sometimes they can make it tricky to see what’s going on, especially if there are many changes in the source
- The target file will export to Word showing these tracked changes as MSWord Tracked Changes format
- If I confirm this segment it is the final version that is added to the Translation Memory. So as if the changes are accepted.
- In the analysis tracked changes in the source are counted as if all changes have been accepted. A better example would be this segment where the analysis is one word irrespective of the mode used to open the file:
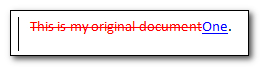
This makes sense when you open the file using Apply changes before opening but as a couple of Translators pointed out during the ATA in San Antonio this year I think it might be helpful to be able to count the effort required when you work using Tracked Changes… so in this example you would have 5 deletions and 1 addition. This is quite simplified of course but I can see the usecase. There might be an interesting solution to this question very soon.
Extract comments
This is another interesting story because I wrote an article in July 2012 when Studio 2011 first introduced the ability to export comments in your target file. The article was called “Did you know you can export Studio comments in your target Word file?” and I had to publish an update when we released SP2 for Studio 2011 and disabled this neat functionality. Fortunately it’s back in Studio 2014 with these options:
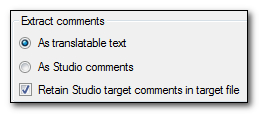
Looking at incoming comments first, the options are pretty explanatory. If you have comments in your MSWord source file then extracting them as translatable text means you have to handle them in Studio and they will be counted in the analysis. So a short text like this in MSWord:

Would be brought into Studio like this:
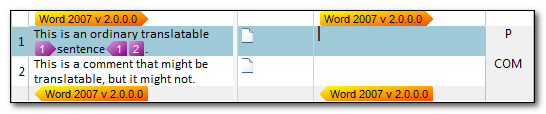
The second segment containing the text in the comment so it can be handled as translatable text. You can identify the fact it is a comment either by working with the realtime preview on or simply by looking at the right hand column where the Document Structure Information make this quite clear through the use of the COM code.
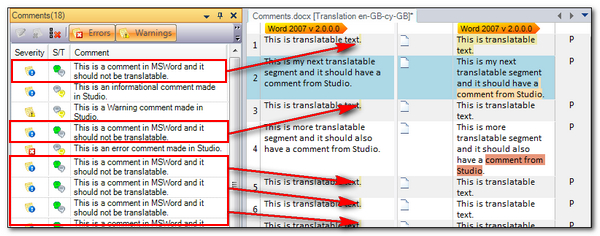
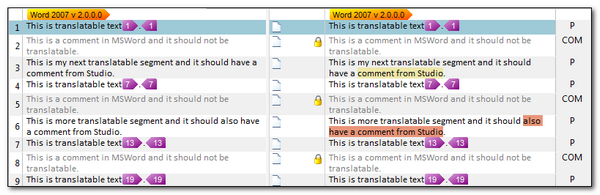
Now, if you don’t need to translate the comments, but you’d still like to be able to see them then you can use the second option which is to extract the comments As Studio comments. When you do this the comments look like this:

You can see the source comment as it’s highlighted around the same word the comment was attached to in MSWord, and you can hover over it to read it. You can also view the comments in the comments window and if you rearrange the windows so that the comments pane is larger and maybe to the left, or right, of your Editing View, or even on a different screen, then you can very easily read the comments as you work or even navigate the document via the comments. In the image below the Comments pane is on the left and split into many columns… I’m just showing the first three. These contain the Severity (Information, Warning or Error) used for Studio comments, S/T (Source/Target) which identifies whether the comment is in the source or the target by the green and yellow icon, and Comment which of course is the comment itself. I annotated the image to show where the source comments are and you can see the target comments by the highlighting in different colours to help visually identify the severity of each one.
When you work with this option the comments are also not included in the analysis count.
Now the last option is more interesting. This provides you with the ability to add comments in Studio and then have them exported into your target document for the reviewer to see in context. This is great, and is something many users wanted to see back after Studio 2011 SP2 removed it. But there is a “funny” effect worth knowing about.
- If you extract comments for translation (they will also be included in the word count) and add your own Studio comments then both the Studio comments and the translated comments will be exported to the target file.
- If you extract comments as Studio source comments (they will not be included in the word count) and add your own Studio target comments then only your Studio target comments will be exported to the target file.
So what happens if you don’t want the source comments included in the word count, but you still want them to be retained in the target file alongside your own Studio comments for the reviewer? The answer is there is no built-in option for this scenario. But you can still handle it with a little help from the SDLXLIFF Toolkit. The process would be this:
- Add your Project file to the Toolkit and generate the Document Structure Information like this:
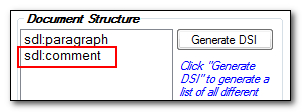
Note the sdl:comment which is the COM code you can see in the Document Structure Information column in Studio - Select sdl:comment and then use the lock segment option and click on Changeit!
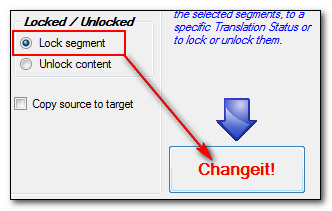
This will lock all the segments that have been extracted as comments for translation in Studio.
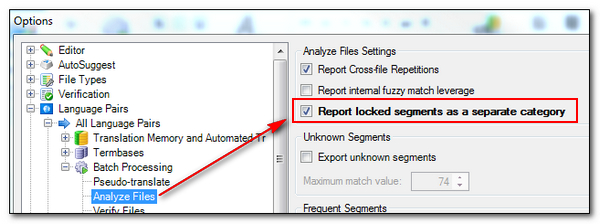
- You can now use the display filter to skip the comments if you don’t want to see them in the Editor, and you can use the new option in Studio 2014 to exclude them from the analysis:
- So now you can add all the comments you like to Studio and when you save the target file both the Studio comments and the original comments will still be in the target file.
Tag Check
This section of the file type options is pretty consistent for almost every file type I have on my installation. The exceptions are some of the OpenExchange file types that don’t use this in their settings. The basic idea here is that you have the ability to decide how the severity of tag differences between source and target is reported and whether they are reported at all as you work. So you have an overriding Enable tag verification and if you check this you then have different options you can check for:
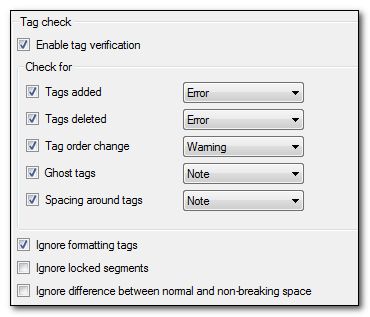
Depending on the content of the files you are translating you may wish to switch some of these off, or change the severity when they are on. For example… handling Word files with lots of formatting that you don’t wish to see in the target translation will not affect your ability to save the target file. So this option is checked to ignore formatting tags by default. But if your client insisted that the same formatting that was used in the source must be used for the target to the best of your ability, then you could set a little aide memoire by unchecking this option and then all formatting omissions will be reported.
If the source document had been incorrectly prepared with normal breaking spaces between numbers and units where you knew it was important to make sure the correct non-breaking space was used in the target then you could check the last option here to ignore this difference. In fact you go a step further and create a QA verification rule to check that where a breaking space had been used inappropriately in the source you always used a non-breaking space in the target… but that would be in the verification settings rather than on the file type.
Quite useful options, and in general the defaults work well. But it’s worth reviewing these settings if you often get warnings where you think it’s inappropriate as you may be able to control them differently in here.
QuickInsert
I’m not going to cover QuickInserts as I think I covered them in an earlier post so it’s clear how they work:
But if anyone has questions on this not answered anywhere else then post a question and perhaps I can revisit this section at a later date. They are available in almost every file type and you have to set them up for every file type which is why I prefer AutoHotkey as a solution to many of the requirements you might have for QuickInserts. Mats Linder provides some interesting solutions to these requirements using another tool called Phrase Express, so I think there are several options to choose from if you want more flexibility and extensibility than you get from QuickInserts alone. You can read about these options in his excellent Studio Manual or in his blog here:
Autocorrection and autocompletion
Font Mapping
This is another feature found throughout most of the file types. It’s main value is in being able to specify a different target font to the one use in the source… and more importantly it will be used in the target document. So whilst font adaptation in the Studio Options can change the font being used in the Editor only… the Font Mapping settings will allow you to change the font in the target document.
I’m not very familiar with fonts and their nuances, but the Studio help provides a good example. Quoting it exactly:
Use the Font mapping settings to specify the fonts that Studio uses
in the target document to replace the fonts used in the source document.
For example, if the target language is Chinese (Taiwan), you might want
to specify that PMingLiu font is used for all text in the target
document, whatever fonts are used in the source document. If so,
specify that for Chinese (Taiwan), all source language fonts are mapped to PMingLiu.

By default, most target languages in this dialog box have only one font
and for that language all source fonts are mapped to one font.

Note: The mapping is done when the target document is created (when the
document is saved as target), so you may not see the mapping in the
editor.
I haven’t addressed every option in this filetype, or covered any of the numerous options that are available in some of the other file types, but I hope it’s provided a little insight how you might be able to use the options available to improve the benefits you get from working with Studio now you know where to look… in case you didn’t already!
is there a simple way to get these in a nice printing format without all the stuff on the sides?
If you subscribe you”ll get an email each time I post and this is nicely formatted I think. For existing articles just copy and paste into a Word document.
Alternative for Ronald: Try Evernote Clearly: http://evernote.com/clearly/
It’s a browser add-on that cuts out “all the stuff on the sides” for clear reading and printing. You can of course connect it to Evernote itself, but it works fine as a standalone app.
(I don’t have any business interest in Evernote Clearly – just discovered it a few weeks ago.)
That’s pretty cool Emma… I hadn’t seen that before but will be using it from now on!
As always, Paul, very interesting and useful. Thank you. I just finished a 160 page-long translation that I am sure would have benefited from your comments.
Sorry it’s too late! But there’s always the next one 🙂
Hi Paul,
In Studio 2014: is there a way to open a document directly into Review Mode? I am not referring to a document that is already listed in your Projects View, but rather fetching a document from your hard-drive for the first time (i.e. a translated document received from your translator) so that it can be edited/reviewed.
Hello Edwin. Out of the box, no. You’d have to open it and save it as a single file project and then open it for review. I believe it’s possible to do this using the powershell toolkit though… might take a look at this and then explain how it’s done, perhaps making something available on the OpenExchange so anyone can use it.
Paul, speaking of File Types–is this a glitch or I’m not doing it right? I edited the parser for the <script> element for XHTML 1.1. (I also edited the parser rule to include structure info.) I clicked ok to save the changes. I would expect these new settings to be present when I create a new project, but they are not. Also, the new settings don’t seem to apply to the current project either. The settings apply only to any new files that I add to the current project after I edited the parser. Can you please advise? (Studio 2014)
Hi Micaela, I think you’re describing the intended behaviour. Once you have parsed a file, changing the rules won’t make any difference. Furthermore, if you make the change in the Project Settings then this won’t be available for new Projects. You need to make the change in the Options for this… File – Options for Studio 2014 and Tools – Options in Studio 2009/2011. There’s a nice analogy from Jerzy Czopik here that explains this quite well – Tea and Settings.
I love Jerzy’s analogy! Thanks a bunch for the clarification, Paul!