I love SDL Trados Studio, and I think it’s easy to use, but sometimes we just hide this fact a little! I think a case in point, and one of the most confusing things for users of SDL Trados Studio is the “Open Document” command. It sounds as though it’s a quick way to open a document to work on. But it’s only like this when you wish to open a document to work on the first time you ever open it.
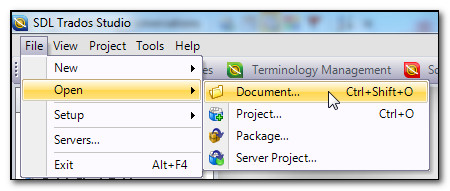
So if you’re not with me yet I’m talking about this:

And this:

And even here…

Yes, this enticing little command is all over the place and in all cases it means the same thing:
Use me if you wish to create a “Single File Project”
This is a very important thing to understand when you use SDL Trados Studio. It’s not difficult, but you must understand it, because if you don’t things can all seem to get a little confusing. So here’s how you should work with the Open Document command, and I’ll start using the big button on the Home screen as shown in the first screenshot, although they all do the same thing.
First you click on the Open Document command and this brings up a familiar windows dialog that allows you to browse to and select the file you wish to translate. Once you select your file you’ll see something like this:

The language pairs (source and target languages) that are displayed are based on the settings you can define under Tools – Options – Editor – Languages

The Translation Memory that is selected is based on whatever you have set up under Tools – Options – Language Pairs – All Language Pairs – Translation Memory and Automated Translation

So you can see that in my dialog the languages are already selected, and the Translation Memory I wish to use most of the time are already selected. So I would then just click on OK and that’s it. The file opens up in the Editor view and I can start translating. It just doesn’t get any easier than that!
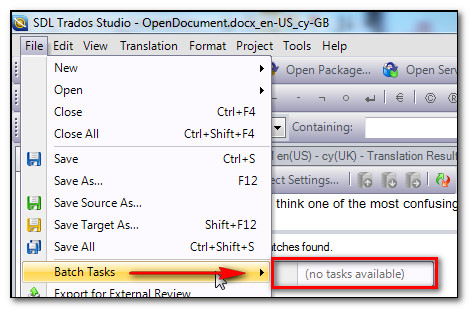
This is where the fun starts. First I would like to analyse the file so I can see how much work I have to do, and I may like to pretranslate it. I know these are features that work by using something called a Batch Task. So I go to my File menu and select the Batch Tasks:

You’ll note that there don’t seem to be any tasks available. Confusing… so I ask on ProZ and someone tells me to look in Project Settings. But I didn’t create a Project, I just opened the document… but I check here anyway. I see this:

I still don’t have any tasks available. So why is this? If this really is a Project then let me check to see if it’s in the Projects View, so I take a look and this is what I see:

Three projects here and all different types:
- Standard Studio project
- Single file project
- Server project
Mine is the one in bold, the “Single file project”. So it is a Project, but I still don’t have the Batch tasks available. By now of course a helpful person on proZ has posted in and suggested I try saving it by pressing ctrl+s or using the toolbar

So I do this and now when I go to the Batch Tasks I see this:

Great… I can see my Analyze task and the Pre-translate function… now I’m happy. I carry on and get half way through my translation when I need to stop work. So I save my work (having learned about the ctrl+s function). A couple of hours later I come back to this and I think… “Open Document”. So I start the process again… first of all seeing this in my window to select the file:

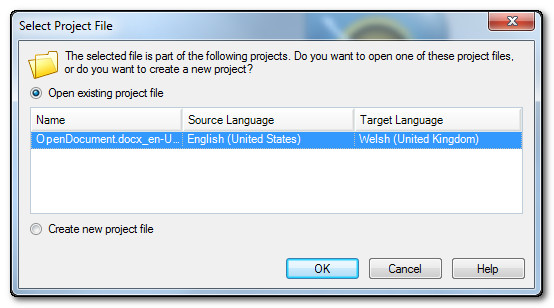
I seem to have more files in there now. Originally I had my word file, and now I have these two other files. I don’t know what they are for so I’ll just open the word file again. I then see this box:

This box is actually telling me that I must have opened this file before, which of course I did, so I’ll just leave this as it is and open the existing project file. This is great, I now have my Single File Project open with all the translations I did before still there, and my Translation Memory is already selected. If I had selected “Create new project file” I would have started all over again, and to make matters worse when I saved it I might have even overwritten the SDLXLIFF from before, losing everything I had done (should be safe in my Translation Memory though as long as I confirmed my translations as I worked).
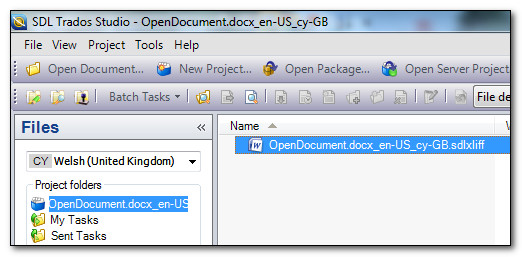
There is however a better way to work after I had created my original “Single File project”. If I make sure that my Project is active in the Projects View (so double click it and it becomes bold) then all I do now is click on the Files View and I see this:

I just double click this file and I open up where I left off. Simple. So the golden rule is only use Open Document the first time you open the file for translation. In fact there are a few rules to remember to be on the safe side:
- Only use the Open Document command the first time you open the file for translation
- As soon as it is open in the Editor View press ctrl+s and save into your preferred location
- Always open the file you have already started translating from the Files View of your active project
All in all, not very complicated once you know how… but I have also recorded a quick, and short, video (… actually just over 8 minutes) that explains what I’ve just written. I hope it’s useful for someone.

Great post. I’ve been using Studio 2011 for some time now and I just made up my mind: No more “open document”. Creating a single file project is actually the right way to work on a file, but up to now I thought that was a complicated procedure. Thank you for casting plenty of light on the subject!
Thank you very much for detailed description, That was very helpful indeed.