 Not Marvel Comics, but rather the number four which does have some pretty interesting properties. It’s the only cardinal number in the English language to have the same number of letters as its value; in Buddhism there are four noble truths; in Harry Potter there are four Houses of Hogwarts; humans have four canines and four wisdom teeth; in chemistry there are four basic states of matter… but more importantly, for translators using Studio 2017 there are four ways, out of the box, to get started!
Now with that very tenuous link let’s get to the point. Four ways to start translating, all of them pretty easy but they all have their pros and cons. So getting to grips with this from the start is going to help you decide which is best for you. First of all what are they?
- Translate single document
- Create a project
- Drag and drop your files
- Right-click and “Translate in SDL Trados Studio”
And now we know what they are should you use one process for all, or can you mix and match? I mix and match all the time, mainly between 1. and 2. but let’s look at the differences first and you can make your own mind up.
Contents
1. Translate Single Document
You can find a full description of this method of working here, but in a nutshell it’s a way of translating a single file without having to go through the full project creation wizard. You just select your document, select your language pairs and translation memories and the file can be opened in the editor immediately for work. The important thing to note with this approach is that when you do this the project is still created in the background but it is always created in the same folder as the original source file. So for many users this is quite a nice way to organise their work because they can use their customer folder structure to support the Studio projects too. Makes for consistent back up and recovery.
The other important point to remember is that when you save the target file it will always default to the same location as the source. You will not be prompted to rename the file and it won’t automatically give the file a different name. So pay attention to this so you don’t overwrite the source if you don’t have it backed up elsewhere. I always use Shift+F12 to save the target file and then press the home key and add t_ to the beginning of the filename name. This has become a habit now and I never overwrite the file.
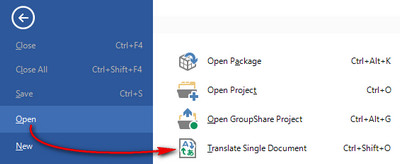
To use this single document approach in Studio 2017 you have to either use File -> Options -> Open -> Translate Single Document or use the keyboard shortcut (my preferred method) Ctrl+Shift+O:
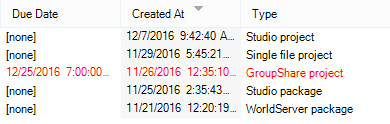
In previous versions of Studio, since Studio 2009, this option was always in the welcome view as you’ll see in the article I referred to earlier. But in Studio 2017 this has been replaced by the drag and drop feature. You may be wondering why I separated this method from the drag and drop, but if you make a note of where the project files go in this method you’ll understand the difference shortly. You’ll always know if you created a single file project because the Projects View distinguishes between the different types like this:
You’ll also note a couple of other things here.
- I did not deal with project packages here (Studio or WorldServer)
- I did not deal with GroupShare projects
Both of these also offer ways to start work, but these are initiated by others. This article is focusing on how to create your own translation projects and the different ways it’s possible to do it. If you’re interested to learn more about working with packages here’s two articles you might find useful:
I haven’t written anything on SDL GroupShare yet… will do this very soon.
2. Create a Project
If you’re looking for a consistent way to create your projects, have the ability to use Project templates (different settings for different clients), then this is the way to go. You can access this by using File -> New -> New Project:

Or by using the New Project icon in the Tasks group on the Home ribbon when you are in the Projects View:

Of course you can also use the predefined keyboard shortcut, Ctrl+N, or use the alt commands, Alt+H+J, when in the Projects View.
What are the benefits of working like this?
- all projects can be created in a single location keeping them separate from your customer folders and making them easy to back up and restore in one go
- projects can be based around custom templates supporting the ability to use different TMs, termbases and other resources; different QA settings; different languages; differrent settings for just about anything. This means changing the setup for different customers is nothing more than the selection of a template. Fast and consistent.
- target files are never going to overwrite your source as they are placed in their own target language folder in the project folder
- ability to use project translation memories – a kind of scratch pad TM
- you can add all your files/folders for translation into one project making it easier to track progress and assess the total work
All in all this would be my preferred route if I was a working translator. You can also find a couple of articles on working with projects here:
You’ll find more articles linked from these but I think they cover a lot of interesting material related to the sort of things users often wonder about when working with Studio projects.
3. Drag and drop your files
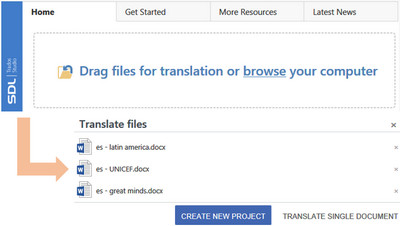
This is a new feature in SDL Trados Studio 2017 and it provides a mechanism for starting work with little more than a drag and drop. You’ll find this in the Welcome View and it replaces the “New Project” and “Translate Single Document” commands you would have seen there in Studio 2015. You still have the “Open Package“, “Open GroupShare Project” and “Language Cloud” commands. This is what you’ll see, and when you drop a file, or a group of files into this interface you are prompted to either “Create New Project” or “Translate Single Document” as shown below:
However, these are not like for like replacements. If you select “Create New Project” then you will be taken through the same project wizard and you’ll get all the benefits of an easy way to start plus the things I described in the previous section. However, if you select “Translate Single Document” then things are different.
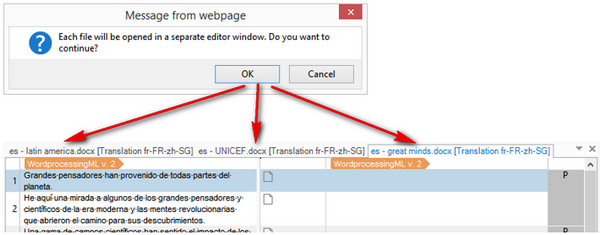
First of all you can handle multiple files, although they are still opened in separate tabs for translation. So you won’t have the benefits of being able to merge them as you would if you created a project. So if I use the three files I dropped in above I am first prompted to choose the language pairs three times (so I could choose different language pairs for each file if appropriate) and then they are opened as three separate single documents projects like this:
So the benefits so far would be these:
- easy to add your files
- saves selecting the files again as you only did it once
However, the biggest difference is when you save that project. Previously it would be saved in the same location as your source file. This no longer happens because now it saves the projects in a folder called “DropFiles“:
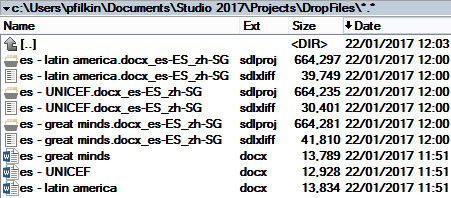
For me this has advantages and disadvantages. The advantage is that this brings it onto a par with standard project creation and if you allow it then Studio will store all the project files in one location under the default Projects folder making for an easy and consistent backup. The disadvantage is that this folder is going to become a disorganised mess in no time at all so if it was me I would move the sdlxliff files into my client folders after the translation was complete and clean up this DropFiles folder completely. However, I think I prefer to use Ctrl+Shift+O and stick with the old method for single file translation.
It’s also worth noting that the location of this folder is not configurable, so if you use project templates to set the location for projects stored by client then any single files handled with this method will not be consistent with this approach. A nice enhancement to the single file workflow would be to be able to select a project template when you see the language dialogue box, but don’t take you though the wizard… just use the settings selected and open the file for translation. If you want more flexibility then you’d just choose the project wizard approach.
The good thing is that there is plenty of choice and you can still select the method most appropriate for you!
Finally, saving target files is the same as before. If you don’t remember to rename the file, or change the location you save it to, then you will overwrite the one in the DropFiles location.
4. Right-click and “Translate in SDL Trados Studio”
The fourth approach to starting work is to open the files directly from windows explorer. All you do is select your file(s), right-click and choose “Translate in SDL Trados Studio“:
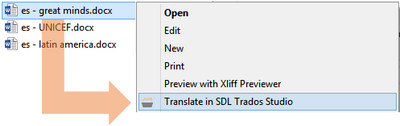
I quite like this approach as it works in a smart way. If you select a single file it will use the single document approach, but as if you used Ctrl+Shift+O from within Studio, So it does not use the DropFiles folder. If you select multiple files then it will take you through the project wizard. So really another nice option for those of you who like to start your work from within your client folders as you’re used to working this way and navigating around your customers in windows explorer.
Using the APIs
I can’t let this article go without mentioning the APIs. The importance of the APIs cannot be emphasised enough as these provide tools for a developer to find even more innovative ways to create projects so they are fully integrated into your companies workflow. By way of example we created a small application called InSource which allows you to create your projects automatically by dropping files into folders that are being “watched”. So as soon as new files arrive in these “watched” folders you can create your projects with a click of a button, or with a few small amendments to the source code have them created automatically.
If you’re feeling adventurous you might like to try the API yourself using powershell. This can be accessed without being a programmer, and for the simplest of tasks you can make it work. I do know this needs updating and you may run into the occasional problem if you start to get more technical, but for basic stuff you might find it interesting.
Conclusion
Now that we’re more familiar with the different ways to start work, or even if you knew all of this already and still read to here, it would be interesting to hear more about the way you start your translation projects? For me it’s still standard projects and the “Translate Single Documents” approach, although I use this less than before as it used to be my default method for checking new filetypes… now I love the new filetype preview approach. But it is still a very useful approach for tracking down filetype errors when quickly splitting files to get to the root of a problem without having to run through the project wizard every time.
People can be forgiven for finding Studio confusing to get started simply because of the numerous ways it is possible to work. But I think the reality is that once you understand these four principles of project creation you can choose one or two that work for you well, and after that it’s plain sailing. I’m reasonably familiar with most of the competitive tools to SDL Trados Studio and I really believe it’s easier to get started with Studio and learn how to use more of the features than in any other tool. Perhaps the time I spend working with this tool has biased my opinion… probably… but now I am as familiar with Studio as I am I can confidently say I find it’s the easiest to use for simple and complex tasks!
yep, four is a good number. It is the smallest composite number, the smallest squared prime, it is the smallest Smith number, it is a Motzkin number, is a key in the Lagrange’s four-square theorem, it is an harshad number, it is a semi-meandric number, it is a key element of the conjecture of Firoozbakht and also the real dimension of space (with time), i will not go into Klein four-groups, but let us say that in group theory and complex topology this number is very important.
Well, my grand daddy explained to me once (I was twelve at the time) the beauty of this number. He knew a thing or two about math since he got the first Fields Medal in 1936.
Great number indeed.
regards,
Ivan
Excellent! I was truly surprised when I researched this a little as there was so much more. So I just picked a few interesting ones. Great story about your Grand Daddy too. Was he Lars Ahlfors or Jesse Douglas? Quite an honour!
Actually, Paul, 90% of the time I start a translation by adding a file to a never-ending client project. You partly cover this workflow in the last point of your list of project benefits: “You can add all your files/folders for translation into one project”, but I don’t do it for the reasons you suggest (track progress, etc.).
By adding a file to an existing project set up for a specific client, I already have all my resources set up – and even have an AHK short cut to bypass the prepare” batch task after adding the file.
That way I don’t have an unwieldy project list, and I delete individual sdlxliff files from projects after delivery.
So maybe it should be the fabulous five rather than the fantastic four 🙂
Nice one Emma… I guess we could go on. Such is the flexibility of Studio 🙂
I do exactly the same: each client has their own Project, new files are simply added to that Project (unless of course the subject matter is radically different OR the language pair is different).
This saves time and it helps keeping track of resources (TMs and Termbases).