 Note to the wise: This article is quite some years old now and the alignment tool has improved a lot with many more useful capabilities since Trados Studio 2021. But there may still be some value in this one so I’m leaving it here for posterity!
The new alignment tool in Studio SP1 has certainly attracted a lot of attention, some good, some not so good… and some where learning a few little tricks might go a long way towards improving the experience of working with it. As with all software releases, the features around this tool will be continually enhanced and I expect to see more improvements later this year. But I thought it would be useful to step back a bit because I don’t think it’s that bad!
When Studio 2009 was first launched one of the first things that many users asked for was a replacement alignment tool for WinAlign. WinAlign has been around since I don’t know when, but it no longer supports the modern file formats that are supported in Studio so it has been overdue for an update for a long time.
It wasn’t until SDL released Studio 2014 in the third quarter of 2013 that a new alignment tool was released. The new tool was based on the premis that most of the time aligning files is a waste of your time! Many users find themselves being provided with a bunch of files, maybe even hundreds, with matching translations where to make matters worse one is often a PDF while the other is a DOC file so the alignment effort, and the value of the resultant Translation Memory is out of proportion. Many translators have told me they have spent days aligning files (normally over the weekend!) to create translation memories they may never get any value from again, and got very little value from in translating the project they aligned for in the first place!
So the idea behind the original Studio 2014 alignment tool was to allow you to very quickly create a usable Translation Memory based on a sliding scale of alignment quality. So you threw your hundred document pairs into the alignment tool, made a decision on what sort of quality you wanted, which in practice could be a little tricky and it paid to do a couple of trial runs with some smaller documents to make sure you had this right, and then with almost one click your Translation Memory was magically created and you could concentrate on the real work of translating.
This desire to make things easy for the translator was a worthy one and most of the time it produces a pretty good alignment and it does this quickly. But it didn’t allow for these:
- Really poor quality files that needed some sort of manual touches to ensure a decent alignment and useful Translation Memory.
- Alignment Projects! It’s not uncommon for a translator, or a company to be tasked with creating the best possible Translation Memory you can get from all the monolingual documents available in both source and target languages.
So, when Studio SP1 was released SDL added an alignment editor to allow both of these things to be catered for. The SP1 release is the first one, and there will be continual improvements to the editor, but the first incarnation does a reasonable job; especially if you know a few simple tricks and ways to work with it.
So, I have created a video, around 17 mins long where I aligned a couple of files and explained some of these tricks as I went along. Hopefully by the time you have watched it to the end you will have a better idea of how to get the most from the existing version and can use it happily while waiting for future enhancements that will improve it even more. I put the video at the end of this post because first of all I thought it would be helpful to just note a few important things that are useful to know when working with the alignment tool.
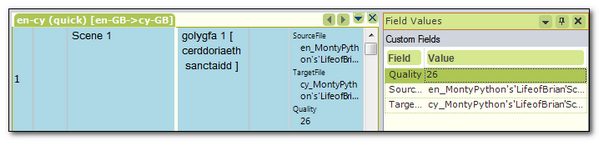
- You can still use the quick alignment and just throw 500 document pairs into the tool and have the Translation Memory created without any effort on your part at all. All aligned segments will have a quality value added as a Field Attribute so you can further refine how you work with this Translation Memory on your Project as well as recording the filename of the source and target files used in the alignment process:
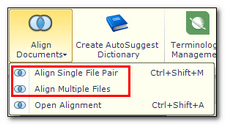
- You can have two kinds of alignment projects. One for working with multiple files and have all the alignment files created and saved ready to open and work with, or you can do a quick file pair alignment that opens immediately in the editor after you select the files and a Translation Memory:
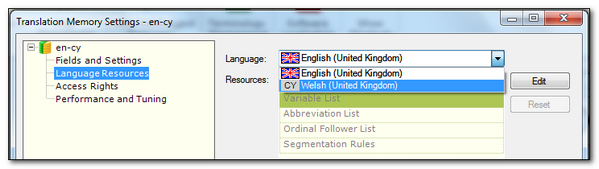
- You can change the segmentation rules and other language resources for the source and/or the target file by selecting the appropriate language in the Translation Memory settings:
- The filetype settings for the files being aligned are based on the active Project in Studio. This is because the assumption is that you will always be aligning for a specific Project and so this will be active before you start. However, we know from the reasons above that this might not always be the case, so a useful tip might be to create a Project just for use in Alignment Projects and then you can change the filetype settings in your dummy Project as needed, and make it the active Project (select it and press the Enter key so it goes bold), whenever you carry out any alignment work:

- If you start the alignment and find that the segments are not automatically aligned very well at all because of differences between the source and target files, then use the Realign function. This is a very powerful way to improve the alignment quite quickly by doing the following:
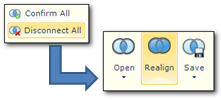
- Disconnect all or some of your segments.
- Connect some of the segments in your alignment projects around the worst affected areas and then click Realign.
- This will take advantage of your “help” and vastly improve the alignment process, reducing your effort and making it easier to work through the file.
- Alignment can be carried out using the icons in the ribbon, with the mouse, with keyboard shortcuts or using the Alignment Edit mode (described in the video)
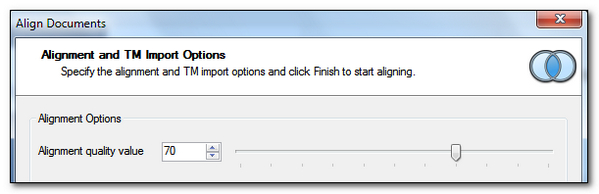
- The finished alignment can be imported into a Translation Memory, or saved as an SDLXLIFF. If you use the latter you can then use Studio to perform quality assurance checks and do any further refined editing you consider necessary if you are preparing a high quality Translation Memory for yourself, or your client. The Quick Import will just import everything into your Translation Memory that you have confirmed… so only quality values of 100. The Advanced Import will allow you to import based on the quality values of the aligned pairs; so you use the slider to set the value and everything above that value will be imported:

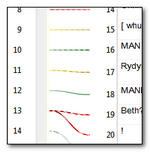
- When you do the alignment the coloured lines have a meaning. Solid green lines are confirmed and have a quality value of 100. Dotted lines are unconfirmed. Colours in red are poor quality value and the greener they get the better the software believes them to be.
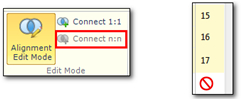
- There is a limit to how many segments you can select to merge. In both Alignment Edit Mode and normal aligning mode you cannot select more than three segments at a time. In Edit mode the Connect n:n command greys out, and in normal mode you will see a small no entry symbol displayed when you try and select the fourth one:
- You cannot split segments. If you need to split segments because you want two Translation Units then this could be carried out by saving the file as an SDLXLIFF and making the changes in there.
- You cannot delete or insert segments. So in the example video where I have added new segments to one of the files on purpose you would simply align around them. You could not insert segments to provide a source translation for them, nor could you delete them to avoid the misalignment.
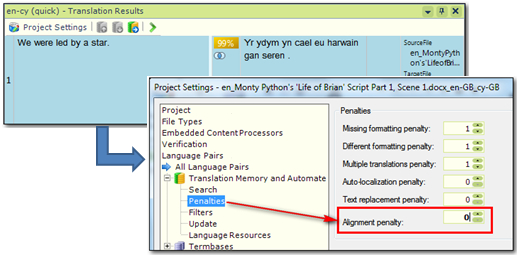
- Alignment penalty… Studio adds a 1% penalty to all Translation Memory results that come from an alignment by default. So you will only get a 99% match even though you confirmed the alignment and it now has a quality value of 100. You can change this to zero and turn your 99% matches into 100% matches here:
I have tried to explain anything else I thought was important in the video. 17 minutes is longer than anything I would normally expect you to sit through, but I hoped it would be useful to work through a complete file and tackle the sort of things you are likely to come across in the process, and the 17 minutes were over almost as soon as I started… or at least it felt like that!
Every time I aligned documents with WinAlign it was worth it. However, before I started working with WinAlign, I always analyzed the old source files first, and then I analyzed the new source files NOT against the TM but against the previous analysis. You remember the “Use TM from previous analysis” option in TWB?
If the analysis would give me a lot of full and fuzzy matches, I knew it would be worth aligning the old files.
With Studio, there is now a way to align files, but is there way to use the “Use TM from previous analysis” option?
Two ways I guess… in Studio you have what’s referred to as an internal analysis. So if you create a project and add both files, probably make sure the original source is first in the list, and then analyse the files against an empty TM. The internal analysis will be based on the assumption that you are getting value from the first file in the list. So it assumes you translated it and then analyses the second file on this basis. I think this will achieve the same result.
The other way is a little more manual. Open the first source file with an empty TM. Copy source to target and update the TM. Now analyse the second file against that TM. This should also do it.
I can see your usecase though and I think it would be pretty cool to have a feature specifically for quickly checking this and returning a value that gave you a quick idea of whether it would be worth it or not. Maybe something as a plugin for the OpenExchange. I’ll look into it.
Maybe also worth remembering that the new alignment in Studio also does a reasonable job of aligning files quickly with no effort. So this is also an option to consider as you don’t have to spend any time on the alignment at all, other than to run it. It’s not always perfect, but it does generally do a fair job.
The second solution is more manual indeed, but it works better. The first solution only reports repetitions between the first and the second file. It is not accurate, but still a good indication to know whether aligning is worth doing or not.
Thanks!
I am using the new alignment tool but am really missing two features from WinAlign (I work for an agency and so our focus is using finished translations from non Studio users to maintain high quality TMs). First, the split/merge segment tool and the ‘Structure Level From Active Unit’ and ‘Force 1:1 connections’ combo. Often, I’ve got quite a long way into the project having ‘tidied up’ a lot of segments using the edit function and come across a particularly mismatched section; I don’t want to use the ‘disconnect all’ button as I’ll lose all the work already done and disconnecting individual segments is long-winded. Are there any work-arounds you can think of? apart from saving as an sdlxliff?
Hey Paul, thanks a lot for such a valuable post. I am still getting used to it but after this post it looks a bit more comfortable. You say the lines have different value. The solid green – 100%, the red lines – the lowest value (which?). This way it is possible to see the alignment quality straight at the beginning by the lines colour, ist’t it? Can you tell us then which value corresponds to which colour? This way I would probably know which value to set when updating my TM. I did some alignment recently and found I did not know what value to set actually.
Paul, thanks for this post, as always very useful and honest. I miss an Alignement option on the Options window. I can only manage the File Types on the Documents for Alignement step and just when aligning multiple files…
Hi Carmen, I’m pretty sure that the alignment module uses the filetype settings for the active project. So if you align a single pair then a good trick is to keep an Alignment Project in place so you make that one active before you run the alignment module.
I am having trouble finding segments that match in a very long RU>EN document. The first-run alignment was very poor. It would be very useful to have a “find” function to search for target text that matches the text in a source segment.
Hi there, thanks so much for the great video, it really helped me get the hang of aligning using the new tool! I am trying to apply your advice to disconnect all segments and then connect a few “key” segments before clicking realign, but Studio is (incorrectly) realigning the segments I manually connected as well, giving me the same crummy results I started with (and undoing my work). Do you know why this could be? Is there a setting or step I am missing?
Reblogged this on 21cloud and commented:
Working with Studio Alignment – SDL Trados Studio 2014 SP1
Dear Paul,
The following sentences are false:
“The Quick Import will just import everything into your Translation Memory that you have confirmed… so only quality values of 100.”
— Quick Import will import any aligned segment pairs regardless of their quality value.
“The Advanced Import will allow you to import based on the quality values of the aligned pairs; so you use the slider to set the value and everything above that value will be imported:”
— Everything on par with or above that value will be imported. If your sentence was true a threshold of 100 would lead to no segment pairs being imported into the TM.
Best regards,
Jesper
Dear Jesper,
Thanks for your comments. I retested what I said at the time using the current version of Studio and in fact I think it is not working at all correctly for me… not even as you have stated here. So I have prepared a report for development and will come back this once things are working as they should.
Paul
Dear Paul,
Thank you for the quick reply. I should have added that I am using SDL 2014 SP1.
Best, Jesper
Dear Paul,
A question this time: Would you be kind enough to elaborate on the importance of activating a translation project with a specific file type prior to creating an alignment project? How does the file type of the active translation project impact the alignment project?
Thank you,
Jesper
Dear Jesper, when I wrote this article the file types that were used when opening the files for alignment were based on the filtypes of the active project. For word, excel, powerpoint etc. this is less relevant, although your project specific settings could have an impact on alignment because of what’s extracted, but if you are aligning custom files for example (XML, TMX, TXML etc.) then it’s very important.
I have not tested this since I wrote the article, but at the time this was required because as you will note there are no alignment settings. It would seem obvious that it should use the default settings but it didn’t, and actually this is probably a good thing because otherwise you would have no way of using custom filetypes for the alignment without changing the defaults every time you did it. So I imagine it should still work the same way.
Make sense?
Paul
Hello, looking for input on Studio 2017, and started watching the video – but the mechanism for manually aligning seems a little different (and harder) with 2017. Or am I missing something? It seems I need to be in ‘alignment edit mode’ and tick boxes for each unit I want to align with another. Also even with the boxes ticked, the options I’d want won’t work for me if I use ‘right click’. They appear, but are greyed out. Are there some settings I should/could change? Thanks…
Hi there, thanks for this tutorial. It was really helpful indeed.
I have edited one the files that I have added to my TM, like you said in the video, I saved it as an SDLXLIFF file and then made my changes via the editor. How can I save these changes and have them reflected onto the TM? … my TM is still not showing the changes I’ve made…. Thanks in advance
Hi Francesca, it sounds as though you need to add your TM to the project you created for editing your SDLXLIFF and if you didn’t update the changes as you worked (and it sounds as though you didn’t) then run the Update Main Translation Memories batch task to ensure that all your changes are placed into the TM.