 There’s been a few ups and downs getting SDL Analyse off the ground, but it’s finally there and it’s worth it! If you have no idea what I’m referring to then perhaps review this article first for a little history. This app was actually released as the 200th app on the SDL AppStore in February this year, but in addition to the applause it received for its functionality there has been less positive aspects for some users that needed to be addressed.
But first, what does it do? Quite simply it allows you to get an analysis of your files without even having to start Studio, or without having to create a Project in Studio. If you’re a regular reader of this blog you may recall I wrote an article in 2014, and in 2011 before that, on how to do an analysis in Studio by using a dummy project. In all that time there has been only one app on the appstore that supports the analysis of files without having to use Studio and this is goAnalyze from Kaleidoscope. In fact goAnalyze can do a lot more than SDL Analyse but there is one significant difference between these apps that makes this one pretty interesting… you don’t require the Professional version of Studio to use it. But it’s also this difference that has been the cause of the ups and downs for some users since SDL Analyse was released. In order to resolve the problem of needing to use the Project Automation API, which needs the Professional version of Studio, the app needed to use a windows service that was hooked into Studio. For the technically minded we had a few things to resolve:
- files are copied under Program Files
- installing a windows service requires admin rights
- the service has to work with resources created by SDL Trados Studio and these are stored under the user folder (so we can’t run with the generic windows account)
So the first release required users to log into their windows account as part of the installation process. This process itself caused quite a stir for a few reasons:
- some users removed the security of a windows login on their computer,
- some users were using a PIN,
- some used a picture password,
- some used a fingerprint, their eye or facial recognition
 This caused quite some difficulties where there was some success in working around the problems, and also some failures where the app was not able to be installed at all. For most users in an Enterprise environment none of these options are likely to be used and so the app developer actually spent time on his wifes computer at home trying to find a way to support the installation process without having to enter the windows login credentials at all. I think he had a eureka moment one Saturday or Sunday morning when he woke up with the answer, and managed to find a way to tackle this. This worked really well and now that there were more people working with the app there was also more requirements to make it work really well. So the next couple of weeks saw a lot of development, testing, feedback… development, testing, feedback… until now! Today we have a new production release that includes the following enhancements:
- easy install with no requirements to log into windows at all
- The desktop client sends the roaming folder to the analysis service instead of the local user.
- Proper character encoding for data sent to the analysis service (failed for some “exotic” usernames)
- Persisted project template is verified to check it actually exists. If not the default template is proposed
. - Fixed error when the line count value was set to zero
. - Fix analysis differences between using a default Studio generated TM and the default TM generated by SDL Analyse
. - Default analysis with no TM or project template for billingual files (XLIFF or SDLXLIFF) takes into consideration the language pair from within the file
- for monolingual files the language pair comes from the Language settings in File -> Options -> Editor -> Languages
- if multiple bilingual files are added the language pair used comes from the first file that is read
- if a TM is used that does not match the bilingual files the report will show zeros (it’s down to the user to get this right!)
- Analyse view has all language pairs checked for report generation by default
- prevents users not realising they needed to check a language or all languages to be able to generate a report
- Fixed a performance issue on large files
But that doesn’t tell you anything yet if you haven’t seen the app before. So let’s see how it works.
SDL Analyse
 The app itself can be found here on the SDL AppStore. At the time of writing this article there are 892 downloads and 20 reviews. I’d love to see things start with a clean slate now as the reviews were made before things were simplified and improved considerably… but c’est la vie! Hopefully we’ll see some positive reviews to change this now.
The installation process is simple:
- Download the app from the store which comes as a zip
- Unzip the msi installer to your desktop or another folder on your drive
- Double click it and it will do three things:
- Creates a local service called “SDL Analyse”
- Adds an icon to your desktop that runs the standalone version of the tool
- Adds an sdlplugin file to this location:
c:ProgramDataSDLSDL Trados Studio14PluginsPackagesSdl.Community.Studio.Analyse.View.sdlplugin
All you need to know however is that you can run it from the new icon on your desktop, or from within a new View in Studio itself. The functions are exactly the same, one runs without the requirement for Studio and the other runs within Studio. Neither of them need you to create a Studio project first. You just drag and drop your files and click analyse! You can find a basic overview and some useful info in the wiki for this app in the SDL Community.
The files themselves can be any filetype that is supported by Studio (plus zip files, so you can zip your files into one and drag and drop the zip if you prefer) but there are a couple of important points to note about language pair control:
- If you do not select a TM, or use a Project Template in the “Advanced View” then the languages are taken from your default settings in File -> Options -> Editor -> Languages:

- If you select a TM, or use a Project Template then the languages will be based on the languages used in these resources.
- The exception to this is XLIFF, XLF, XLZ and SDLXLIFF files. If you add files of these types to SDL Analyse then the application will use the language direction of the first xliff it reads. So it’s your responsibility to make sure that the files are grouped into one language pair at a time and then you add them for analysis.
I have mentioned an advanced view, so will just touch on that briefly. The app has two modes “simple view” and “advanced view” as shown below:
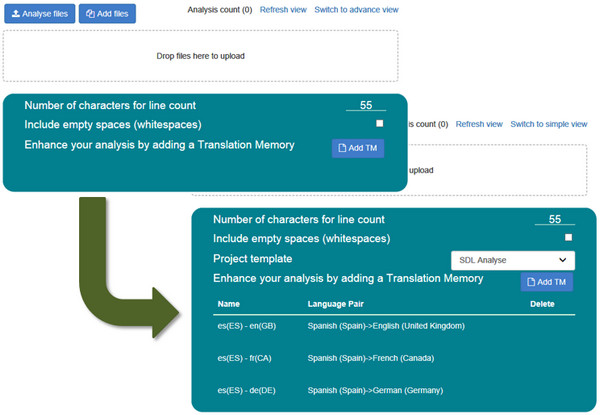
The difference between them is that the advanced view supports the use of Project Templates. These templates are taken from the templates you have configured in Studio. If you haven’t used templates before, then I’d recommend you do as they are really powerful and very simple to use. You can find more on project templates in this article. If you use the “simple view” then you can optionally add Translation Memories, or don’t use one at all in which case the app will create it’s own in the background.
The Analysis
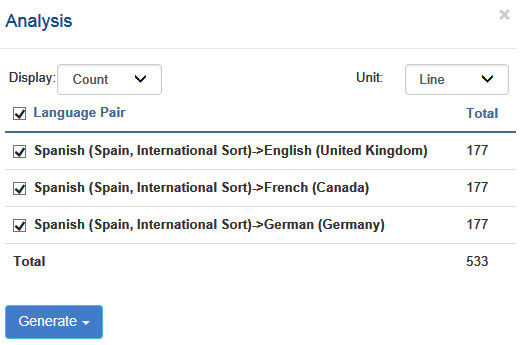
The analysis report itself is based on the Studio options and you are presented with a simple summary on screen before you generate the type of report you wish to use. The onscreen report can display a count or a percentage value. These are then based on various units that you’ll be familiar with (word, character, segment and line).
Note I mentioned “line” at the end of that last sentence which is not something you’ll see in Studio out of the box. The idea here is that you specify how many characters make up a line, and whether you want spaces to be included or not. The default is 55 but you can change this to whatever you prefer. I believe this originated in German speaking countries and was based on DIN 2345, but I have no idea whether there is an updated standard for this. In practical terms it probably doesn’t matter either… 55 characters is your default, you set whatever you like:
![]()
Once the analysis is complete the report is very simple and just gives you the number of lines based on the criteria above.
Once you have your report on screen you can then generate the report format you would prefer by clicking on the blue Generate button.
Reporting
The reporting from the app matches exactly what Studio provides, and then adds a couple more options. So you have these:
- Studio formats: HTML, XLSX, XML
- Once the analysis has generated you can choose where you wish the reports to be placed and you’ll find they are exactly the same as the detailed reports provided by Studio
- Additional options
- CSV: a simple csv based format to mirror the way Trados 2007 used to provide its reports
- Clipboard: copies the report to the windows clipboard as html for a nicely formatted report in email for example and it matches exactly what’s displayed on the screen when you run the application:

Limitations
The next to last thing I wanted to mention was limitations as there are a few:
- The maximum filesize you can analyse is 2Gb. It’s this large to cater for zipped files mostly as I don’t think you come across too many translatable files of this size.
- The maximum number of files you can add is 50. If there are more than that I’d recommend you zip them. So no real restriction here, just a preferred way of working.
- Analysis Count. You’ll notice that there is a small counter at the top that increments by one each time you run an analysis:

This resets itself every hour and starts again from zero. Why? Because if you have the Freelance version of Studio then after the count reaches 10 you will be unable to run another analysis until the hour is up. It is a rolling hour though, so you won’t have to wait a whole hour before running it again. In other words in a 60 minute period, any 60 minute period, you can’t run more than 10 analyses. The reason for this is because the Project Automation API is really a feature supported by the Professional Version of the software. So it was important to ensure that the Freelance version could not be used to automate high volumes of file analysis feature of Studio.
However, if this value of 10 proves to be too restrictive for a translator using the Freelance version of the software then we’ll change it. The important thing here is we want to be fair. So far it seems to be a sensible figure.
That’s about it so far. We do have a list of things on our trello board that we might provide in a future version of the product, but if you have any suggestions I’d recommend you post them into the ideas site on the SDL Community: http://ideas.sdl.com
A Demo
To finish up, the last thing is a short video I have created showing how the app is installed, where the SDL Analyse service can be found and how to use the app in practice. I hope it’s useful, and I really hope you like the app. It’s an idea from Marta that has turned into one of my favourite apps… makes the analysis a breeze, even better than Trados Workbench!
Approx. 12 mins running time
Thanks, Paul. It works. I believe the selected tm’s stay in the interface so you don’t have to reselect them for every analysis? Now I only need to resolve the mystery of large differences in analysis between various CAT tools 🙂
Excellent… glad to read this Lianne. Yes, that’s exactly why the TMs stay there. The app is designed to remember the last set up you had so if you consistently work with the same setup and don’t use project templates then it should save a little time.
The mystery of analysis between tools is tricky. I did an analysis showing just some differences between tools a while ago, but it probably won’t help with your query… I will look at this and see if I can help.
Glad to hear the app is now available. Unfortunately, I am having trouble downloading it, The following error is displayed:
“Download not avaliable
You have logged in successfully, but this app is not available for you to download because it is related to a license of SDL Trados Studio. For more information, please see the Terms and Conditions ”
We have numerous Studio licenses. Any idea what might be the problem?
Thanks.
Hi Christian, indeed you do have various licences. But you don’t have Studio 2017 and this is the only version that supports the app.
Excited about this analyse app! However, not able to test it out yet as I’m getting the message “No project templates are defined”. I deleted old registry items for Studio4, etc. but it didn’t seem to help. Can’t find a solution anywhere else in the community.
Am I missing something?
Hello Jim, it’s going to be best if you post this question into the community here, http://community.sdl.com/appsupport, it’s much easier to help in that environment.
To give you some guidance though it may be that the application is unable to locate your Project Template folder. This could be because they are stored on an external drive, or maybe that they are in a location where more permissions are required to access them, or maybe you don’t have admin rights in Studio?
SDLXLIFFit (http://appstore.sdl.com/app/sdlxliffit/261/) is another app from the SDL app store that creates analysis reports without having to start SDL Trados Studio.
SDLXLIFFit uses the project template to create source language SDLXLIFF files in the background. It also creates an analysis report when creating the SDLXLIFF files. So, there are actually three apps that create reports outside of Studio.
SDLXLIFFit uses the SDL Trados Studio project automation API and thus needs a professional license of SDL Trados Studio to work. I think the same is true for Kaleidoscope’s goAnalyze.
Thanks Tom. I wasn’t aware SDLXLIFFit also created an analysis, so useful to know. As I mentioned in the article goAnalyze also requires the Professional licence, so this is an important differentiator between all the analysis apps. SDL Analyse is also designed to just do the analysis, so probably a more simplified tool.
Reblogged this on International Language Services – Isabelle F. Brucher – Translation office specializing in Law, Finance and Marketing since 2004 and commented:
#SDL’s 200th #app, ‘SDL Analyse’, analyses fuzzy matches out of #Trados/a Trados Project! #SDLanalyse
All this verbosity for what?
.ts files can be translated using Qt Linguist (freeware).
If you want to use your preferred CAT, just use Save as… in Qt Linguist, and export your file as .po or .xlf (xliff). Import this .xlf in memoQ or Trados, complete the translation, then (important!) export the translated file as xliff. this latter can be then opened in Qt Linguist, and Saved as .ts file, which you can send to your customer.
Indeed… although your explanation was quite boring if it was intended to be a blog article, in the wrong place (not this article), incomplete and incorrect. It also wouldn’t help anyone unless they knew where to find Qt Linguist in the first place, which was the point. Anyway… was just writing my journey because I didn’t find it so easy either so I’m not surprised so many people have the same problem. It’s clear when you finally get your hands on Qt Linguist, and I think it’s clear PO is the better intermediate format. I also came across a problem yesterday where XLIFF actually skipped translatable material if you have other fields being used in Qt Linguist. Things are not always as simple as you make out and the best solutions if you’re serious about working with these formats are probably Passolo and Qt Linguist itself.
Qt Linguist is not Freeware either. It is Free Software, but not Freeware. There is a difference. It’s released with two options. The first is a commercial licence where you might make changes to the source code and not share it with anyone, the other is under LGPL.
I believe there are still a few glitches.
I dragged two zip files onto the program window..
Two analyze buttons appeared. I clicked the first button and got a result after a few minutes.
The popup with the character count offerred to generate a report.
When I clicked on Generate and then backed out of the file name selection window, I could not click generate again.
Also, clicking on the analyze next to the second zip archive produced a 0 (zero) word count, even though I know there are many files in it, actually even more than in the first zip file.
The tool must be reliable and predictable to be widely adopted.
Hi Piotr, you got us. We never actually tested multiple zip files into the app. I think the reasoning was that as it is a zip you’d use one, not several. For now probably good to not do that and we may look at adding support for multiple zips in the future.