 At the beginning of each year we probably all review our priorities for the New Year ahead so we have a well balanced start… use that gym membership properly, study for a new language, get accredited in some new skill, stop eating chocolate… although that may be going just a bit too far, everything is fine with a little moderation! I have to admit that moderating chocolate isn’t, and may never be, one of my strong points even though it’s on my list again this year! But the idea of looking at our priorities and setting them up appropriately is a good one so I thought I’d start off 2018 with a short article explaining why this is even important when using SDL Trados Studio, particularly because I see new users struggling with, or just not being aware of, the concepts around the prioritisation of filetypes. If you don’t understand them then you can find code doesn’t get tagged correctly despite you setting it up, or non-translatable text is always getting extracted for translation even though you’re sure you excluded it, or even files being completely mishandled.
Filetype locations
So, what are the things you need to understand when working with filetypes, and I mean any filetype? The first thing is where they are located. There are essentially three places:
- your File -> Options -> Filetypes,
- your Project Settings -> Filetypes and
- your File -> Setup -> Project Templates -> “Template” -> Edit -> Filetypes.
They look the same, and probably originated from the same place, but they behave differently. So first of all you should learn the difference between them. I’d recommend you review this short article called “Tea and Settings” which is a brilliant explanation from Jerzy Czopik on the fundamental difference between the first two. The short version is this:
- All projects are created using filetypes in your File -> Options (unless you use Project Templates)
- Once the Project has been created, any new files added to that Project will use the filetype settings in that Project, your Project Settings, and not File -> Options
So where do Project Templates come into it? These are just a way to save different types of settings so you don’t have to keep editing your File -> Options. Instead of editing them all the time you can save your settings with any name you like as a Project Template and then when you create your new Project you can just call up the template you wanted to use. I have covered this topic before so perhaps review “Keep Calm and use your Project Templates…” for a bit more detail. When it comes to filetypes Project Templates really come into their own because as we’re about to see Studio doesn’t always make things simple… so I’ll come back to this in a while.
Prioritising Filetypes
I’m guessing you already knew all about the things I have mentioned so far, didn’t you? You might even know what I’m going to tell you next but another guess would be most of you reading this article won’t. Using the correct location described above isn’t enough because you also need to make sure that the filetype in that location is actually going to be used when you create your Project. Confused? I’m not surprised, and for the most part you might have never noticed this at all and never thought it to be a problem… in fact it probably wasn’t a problem for the majority. But if you work with Office files, especially since SDL Trados Studio 2017, then this is a very important piece of information to understand.
- The order of the filetypes in your settings matters because Studio always uses the first one it comes to
What do I mean by that? In the screenshot below I have taken my defaults and highlighted two areas:
- the Microsoft Office Filetypes
- The “Move Up” and “Move Down” buttons

I chose these particular filetypes because for three Microsoft applications, Word, Excel and Powerpoint we have a bewildering 13 different filetypes! Now, there are good reasons for this technically, but it would be so much better if Studio didn’t care and just used the correct one in the same way Microsoft Office does, wouldn’t it? For major differences it does, so it can tell the difference between a DOC and a DOCX, or an XLS and an XLSX for example. But it can’t tell the difference between the two different DOCX filetypes or the three different XLSX filetypes. So this is where you have to provide a little help if it’s important to you. You can do this in two ways:
- Deactivate the filetypes you don’t wish to use, or
- Use the “Move Up” and “Move Down” buttons to put the one you want to use above the rest
I just used the words “So this is where you have to provide a little help if it’s important to you.“. Why would it be important? Let’s say you wanted to handle an Excel file that had been prepared as a bilingual Excel file (review “Bilingual Excel… and stuff!” for more information on this filetype). This file is just an XLSX file, so you can make all the changes you like to the filetype settings to configure the Bilingual Excel filetype but Studio won’t ever see them with the default settings because it will open the Excel file using the “Microsoft Excel 2007-2016” filetype as it’s the first one on the list. Another example, let’s say you were preparing projects with DOCX files that would be handled by Translators using SDL Trados Studio 2014 and it was important for them to be able to save the target files (assuming it was appropriate as the newer filetype is much better of course!) then the DOCX file would always be prepared with the “Microsoft Word 2007-2016” filetype and the “Microsoft Word 2007-2013” would never be used at all… your Studio 2014 translators would be able to open the files to work on them but they’d see error messages in Studio (just informational but worrying nonetheless) and they would not be able to save the target files.
So to set up your options to deal with just these two scenarios you would either do this where you only activate the filetype you want (I highlighted the filetypes that could be used for DOCX and XLSX):

Or you can prioritise the filetypes to be used first like this for example:
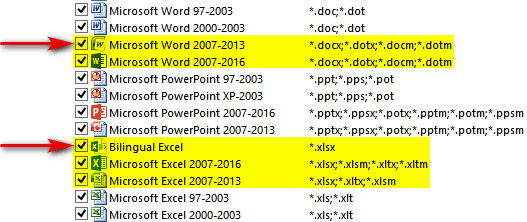
Now they are at the top of their group and will always be used first.
That all seems simple enough, but it means you have to do this every time you want to achieve something different, and if you forget to change your settings back you’ll get unexpected results, and as we know from “Tea and Settings” it means you have to start over. So this is where your Project Templates can come in. If you always create Studio Projects and don’t use the Single Document workflow (see ““Open Document”… or did you mean “Create a single file Project”” for more details, it’s a little old and we have the drag and drop approach in Studio 2017 but the principles are sound I think) then you have a consistent approach for your work. If you need to use the “Bilingual Excel” filetype then just create a Template that has your filetype settings configured to achieve that for example. You can have as many Project Templates as you like so it makes sense to use them to save having to keep changing your settings.
There are, as always, reasons why this approach would not work for everyone:
- You want to use the single document approach because you like organising your work with the SDLXLIFF files always saved in the same folder as your clients folders, and
- Your project consists of both a bilingual Excel file and a monolingual Excel file
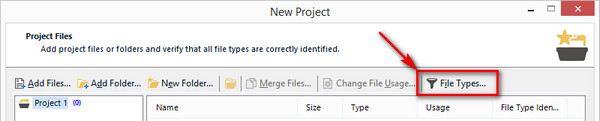
The latter approach means you create your project with all the monolingual Excel files first (for example) and then change the filetype settings in your Project Settings (as we now know) and add the bilingual files to your existing project afterwards, or you add the files in two goes when you create the Project. Add the monolingual files first, and then change your filetype settings here in the Project Wizard after adding the monolingual files:
If you’re using the single document approach then you can still change the settings by using the “Advanced” button when you open the file and this will take you to your Options so you can change the filetype settings to suit:

On a final note it’s worth pointing out that whilst I only used DOCX and XLSX as an example the same thing could apply to any of the filetypes in Studio, even if you just wanted different settings for different customers. So the solutions are all there and you can work any way you prefer, but it’s important to understand how file selection works and which options in which location are being used because then you’ll always understand the fundamental mechanisms that dictate where changes need to be made and why. Once you understand this it’s not too tricky either!
0 thoughts on “Priorities… paths… filetypes….”