 Is English (Europe) the new language on the other side of the Channel that we’ll all have to learn if Brexit actually happens… will Microsoft ever create a spellchecker for it now they added it to Windows 10? Why are there 94 different variants of English in Studio coming from the Microsoft operating system and only two Microsoft Word English spellcheckers? Why don’t we have English (Scouse), English (Geordie) or English (Brummie)… probably more distinct than the differences between English (United States) and English (United Kingdom) which are the two variants Microsoft can spellcheck. These questions, and similar ones for other language variants are all questions I can’t answer and this article isn’t going to address! But I am going to address a few of the problems that having so many variants can create for users of SDL Trados Studio.
Updating a translation memory
Emma Goldsmith wrote “SDL Trados Studio TM isn’t updating! My translation memory is empty!” in 2013 and it’s a very useful article helping users to answer the question about why their translation memories won’t update. But there’s another one I have come across a few times recently and it’s all related to these pesky variants! Let’s say you start using Studio and you have been working on projects using the “translate single document” approach for de(DE) into en(US), so you also have a translation memory with these variants. Then one day you’re asked to translate into en(UK), so you create your project using de(DE) -> en(UK) thinking you’ll add the translation memory later since it didn’t appear in the way it usually does, only to discover you can’t use the translation memory you have because the language variants are different. Fortunately someone tells you about AnyTM and you add your TM to the project anyway and all is well!
All is well until you are sent ten files and you decide to create a standard Studio project for this. You haven’t done this before but as you work through the settings all seems well and you don’t notice that you have two target languages in the project wizard:
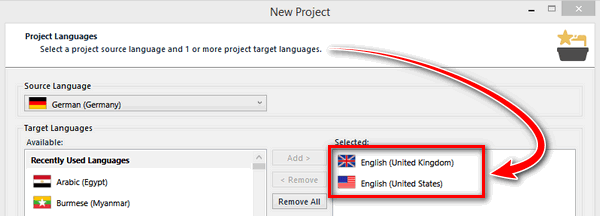
Even if you did notice the two languages you might not realise the implications since the one you want is there, English (United States). You don’t even notice something could be wrong after adding your files since you see your translation memory all set up and ready to go:

You carry on working through the wizard and open the first file to work on it by double clicking on the first one in the list, you translate the file and as you work through it you notice that your TM is not being updated and you see this message in the translation results window:

You check your Project Settings and the translation memory is there and checked to update. What’s going on? You google the problem and review Emma’s blog… still can’t sort it, so you post into the RWS Community and nobody can help you there either! So let’s examine the facts.
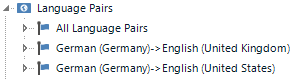
- You created a multilingual project that is for de(DE) -> en(UK) and de(DE) -> en(US).
- You have a translation memory for de(DE) -> en(US) but not for de(DE) -> en(UK)
- You opened the first file in the list without checking the language so alphabetically this is en(UK)

A multilingual project means you have one source language and at least two target languages. You translate the files for each language by selecting the appropriate language from the drop down in the Files View shown above. What this means is that the default language will be the first in the list and in this case it’s en(UK). However you only have a translation memory for en(US) so opening the file in your project without changing the language in the drop down first means you are now translating the file without a translation memory at all and this of course explains why you get the message “No open translation memories…” and why your en(US) translation memory is not being updated.
ok… all understood so far but why does Studio show the translation memory in the Project Settings if it’s not there? The reason is explained by the way the Language Pairs are organised in your settings:
The way Studio works is that it provides a way to apply settings and translation memories for all the languages in a multilingual project by adding them to “All Language Pairs“. This is very handy and can save a lot of work on projects with 30 or 40 target languages. You can also specify different settings for any one or all of the target languages by checking this box for the languages in question, in this case de(DE) -> en(UK):
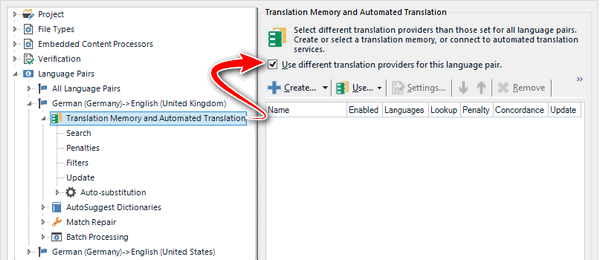
If, after checking that box, I now go back to my “All Language Pairs” I would see that I am also told that the de(DE) -> en(UK) language pair is now using a different Translation Provider, followed up by the very helpful message that there are “No translation providers” because I only have a translation memory added for de(DE) -> en(US). There are no memories available for an en(UK) target language because I have never added one. If I applied this checkbox to the en(US) target language as well then I’d see this:

Now it starts to make sense because I can clearly see I don’t have a translation memory for one of the language pairs and it’s clear which one it is. But unless I was always using the specific language pair settings it’s easy to miss until you understand what’s happening behind the scenes. In fact unless you worked with multilingual projects on purpose you could be forgiven for not noticing this at all.
So, now we’ve hopefully cleared that up what are the options? You have a few:
- The easiest solution if you don’t care about the differences between en(UK) and en(US) is to remove your translation memory from your settings and then add it back in again using AnyTM. This way the same translation memory will be used by both language pairs, OR
- Add an existing translation memory with the right language pair to your project, OR
- Create a new translation memory with the missing language pair and add it to your project. This would only really be sensible if you actually wanted to use en(UK) in the first place and it was important to have different translation memories, OR
- Close the file, switch to the correct target language (en(US)) in the Files View and import your translated SDLXLIFF files from the wrong language into your TM. Make sure you don’t exclude the language variants:

Then pretranslate your files to get back to where you were.
So not a huge problem with a few ways to resolve it. But I think worth noting how this happens and ensure you pay attention to the number of target languages to avoid something like this happening in the future.
Merging Translation Memories
Around five years ago I created a video showing how to merge translation memories which works really nicely and shows the power of SDL Trados Studio for things like like this. But what it doesn’t handle for merging is variants. If I have three en(US) -> de(DE) translation memories and one en(UK) -> de(AT) translation memory then the best this feature can offer when I try to merge based on language pair is this:
Two translation memories instead of four because it can’t ignore the variants in the same way an import can. So if you find yourself in this situation and wish to create a single English to German TM that you intend to use for all variants because you don’t worry about the differences, or you have some other way of identifying differences using Fields and Attributes for example, then the process would be this:
- Merge all your translation memories that are the same variants as shown in the video referred to above to get one translation memory
- Export the variant translation memories (Im starting to feel as though I’m being racist!) to TMX
- Import the TMX files into your one SDLTM and make sure you don’t check the option to exclude variants as we did for the SDLXLIFF files earlier on
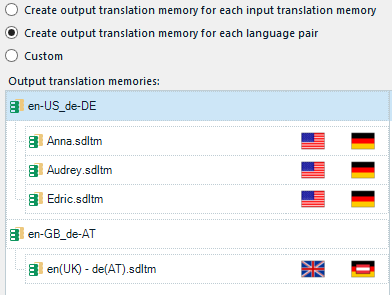
So this is also fairly straightforward to solve and it probably easier than editing the language codes in the TMX file. If you do want to use field values to identify the variants and work with one TM then you need to export all of your TMs to TMX (after merging to reduce the number if you have a lot of them) and then create a new SDLTM containing the appropriate fields like this for example:

Then import your TMX files and choose the variant that is appropriate like this for example:

The same approach would then apply to your future translations… you would select the appropriate field values for your projects and stamp each translation unit accordingly. If you don’t remember to do this religiously then the whole idea of using fields and attributes in this way becomes a nonsense… so think carefully before you decide to work this way:

My personal opinion is that this explanation of fields and attributes is more of a “what’s possible” than “what’s sensible” and if you wish to retain the ability to uniquely identify differences between variants then you should use multiple translation memories. This is really simple and explained in this article. What’s also interesting is that when I wrote that one there were apparently 16 variants of English, and here we are, over 5 years later and we have 94! How did that happen! More importantly, if you actually receive work with these variants and you use field values just imagine how complicated it could get!
And the last thing of course (already explained in the articles I’ve referenced) if you do decide to use one translation memory for all your work is that you’ll need to use AnyTM to add your translation memory in your options and your project templates. This will ensure your translation memory will always be used irrespective of the variants you use.
Spellchecking
The last thing I wanted to cover in relation to these pesky variants is spell checking. When you complete your translation and look for the spell check you are going to see one of these things and it doesn’t matter whether you are using Microsoft Word as your default spellchecker or Hunspell… you can still have this problem, although there is potentially better coverage with Hunspell:
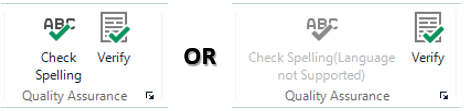
It’s pretty annoying when you get the “not supported” message, but let’s look at why this is and I’ll use English as the target language for this illustration. 94 variants and Microsoft Word covers two of them, en(US and en(UK). Now, having said that the Microsoft Word spell checker will kick in with more varieties… in fact these ones; Australia, Belize, Canada, Ireland, India, Jamaica, Malaysia, New Zealand, Philippines, Singapore, South Africa, United Kingdom and United States. Why is this? I have no idea but perhaps there’s a quick win in there somewhere once we find out!
For now we know you can spellcheck 13 English variants using Microsoft Word while Hunspell doesn’t fare so well out of the box as it only supports 7 variants… Caribbean, Australia, Canada, New Zealand, South Africa, United Kingdom and United States. But Hunspell does have a significant advantage over Microsoft Word and that is… it’s a doddle to add new ones! Here’s how it’s done.
- Navigate to the Studio program folder and you’ll find the HunspellDictionaries folder. In Studio 2017 it’ll be in here:
c:Program Files (x86)SDLSDL Trados StudioStudio5HunspellDictionaries
In Studio 2015 it’s in Studio 4 and so on. - In this folder you’ll find a pair of files for each language that is supported, an .AFF file and a .DIC file.
For example en_GB.aff and en_GB.dic are the files relevant to English (United Kingdom), en_AU.aff and en_AU.dic are the files relevant to English (Australia). The file names use the Windows Language Code Identifier (LCID) reference, or culture identifiers. - You will also find a config file, there’s only one of these, called spellcheckmanager_config.xml
- To add a new language variant you can just make a copy of the .AFF and .DIC files for the variant you consider most similar and name them with the appropriate LCID reference, and then add a couple of lines into the spellcheckmanager_config.xml so Studio can find them.
- Quick tip: if you’re not sure how to get the appropriate LCID then just open any file as a single file translation and select the language variant you want. Studio will name the file using the language codes. Sometimes you could guess them, so en-GI is English Gibralter for example and you would name the files en_GI.aff and en_GI.dic, but I doubt you’d guess English Europe which is en-150, or English World which is en-001.
- Once you’ve got your .AFF and .DIC files you just make some space in the spellcheckmanager_config.xml using a decent text editor and add a few lines like this for example and save the file:
<language>
<isoCode>en-GI</isoCode>
<dict>en_GI</dict>
</language>- Quick tip: pay attention to the differences in the way the codes are written in each line. The isoCode element uses a hyphen to separate the language and variant, the dict element uses an underscore.
- You may find you need to have admin rights to make these changes to files in the Studio program folders. I find it’s easier to copy them into a folder where I don’t need these rights, make the changes and save them, and then copy them back into the correct folder with admin rights afterwards.
There is a knowledgebase article here which explains how to do this, but since I’ve seen many people still struggling here’s a short video demonstrating how it’s done using English Europe, or en-150.
Duration: 9 minutes 13 seconds
Perhaps worth mentioning that the language default when creating a termbase is English, French, German, i.e. no variants, which can be optionally selected. Tthe tradition in terminology e.g. IATE or Eurovoc for the European Union, tends to be one of not having language variations. Any chance a similar option could be created for Studio 2019 for TMs i.e. “just” English or “just” French, etc. I got the impression from a Road Show last week that languages may not come directly from Windows in Trados 2019, or was that my misunderstanding? If “just” English etc. was possible, that might be a welcome simplification for those not needing to distinguish between variations.
Indeed… and it’s pretty simple to use attributes on the terms to define the variants if you need them. A bit messy with a TM I think. AnyTM gets around the problem quite nicely and reduces the need for the bigger changes that would be required to support only English, German, French etc., but I’m with you on this one. I’d like to see main language only options too, but I think you misunderstood something from the roadshow.
A “SimpleTM” mode in Trados would probably be most useful to everyone. That is to say, all English TMs would accept records from any variant of English, with an option to penalize different variants with a custom value and perhaps give a different fuzzy match color code for out-of-variant translations. For example, the Hiltons have a sign outside of their Beijing hotel, which receives many American guests:
“Warning: this hotel does not assume any liability for damage to vehicles parked in its parking lot.”
In the grand Hong Kong edge city of Shenzhen, British English may be preferred:
“Warning: this hotel does not assume any liability for damage to vehicles parked in its carpark.” (or whatever the best British variant is)
The source would be the same, but target variant different. But the target difference would be 5%, so it’s as good as a 95% match. Logically, a translator would not segregate their British English and American English translation memories, but instead they would want to display this as a good but not perfect match from a different language variant. Nobody in their right mind would throw away perfectly good American TM matches for such a reason. The logic of totally segregating language variants does not make much sense.
Hello Paul, many thanks – this is a very helpful article. I have recently noticed that the Studio packages I create never include the TMs that I have added visa AnyTM. This explains perfectly why!