 Every time a new release of SDL Trados Studio is released there are usually a flurry of blogs and videos explaining what’s in them, some are really useful and full of details that will help a user decide whether the upgrade is for them or not, and others are written without any real understanding of what’s in the software or why the upgrade will help. That’s really par for the course and always to be expected since everyone is looking for the things they would like to meet their own needs. So for me, when I’m looking for independent reviews of anything, I find the more helpful reviews give me as much information as possible and I can make my own mind up based on the utility I’ll get from it, the fun in using it and the cost of upgrade. I put a couple of what I would consider helpful reviews here as they both try to cover as many of the new features available as possible. So if you are in the early stages of wondering at a high level what’s in it for you then you could do a lot worse than spending 10 or 20 minutes of your time to read/watch the contributions from Emma and Nora below.
If you like to look at detail then this blog by Emma Goldsmith is well worth a read:

If watching a video is more your thing then I’d recommend this one by Nora Diaz – published through twitter:
.@NoraDiazB shares her experience of using #Trados2019 for the first time… #xl8 pic.twitter.com/1KlcjR0LWJ
— Trados (@rwstrados) August 23, 2018
Both an excellent overview of what’s in the 2019 release, but more importantly I think they both reflect the aims of this release which is captured in full by the Studio Product Manager in his blog article. Ever since the early days of Trados Translators Workbench and it’s evolution into more of a translation platform SDL Trados software has, for some, been considered complex. I don’t know how many people will remember the guide put together by Life Jenson called “Trados for Idiots by an Idiot” (reproduced by me in this article) but I think that reflected the difficulties experienced even then. Today with so many new features and hundreds, even thousands, of possible settings it’s very easy to get lost and feel overwhelmed. Even experienced users can forget where to find things although they have a more advanced starting point because they know a particular capability is in there somewhere!
So this release really had a focus on two things:
- improving the user experience so that even beginners can find their way around the tool more easily
- improving the platform under the hood as part of a continuing drive to support ongoing innovation
The second of these things is often a hard pill to swallow, albeit a necessary one. There will always be some users who will complain if they don’t see lots of new features with every release because they won’t see the value in upgrading otherwise. There will always be a sales and marketing department wondering how they’re going to sell something they can’t see! There are obvious things under the hood to help our developer community, like a few new APIs that have not been documented yet. Some of the more inquisitive developers have already seen some opportunity there and figured out how to use them without the need for any help from SDL! The developer of BaccS for example has used the new notification API to remind you to create your quotes and invoices for new projects… very smart and helpful. The new “Tell me” feature in Studio 2019 also comes with an API so app developers could provide better guidance for their users in helping them to use the apps they have created. These are all obvious things, less obvious changes would be very wide ranging platform changes to help support work planned for the future and provide the ability to deliver new features in better ways. Part of that is a real focus on bug fixing and 2019 comes with some improved telemetry that reports every error, whether it surfaces to the user with an irritating error message or not, to the development team. This allows them to identify areas of the software that are not performing as intended and fix them faster and more efficiently than before. Of course this does rely on two things… the first is that you are using SDL Trados 2019, and secondly you must agree to send SDL the data under the hood. When you first start Studio you probably saw this… it’s in your interest to join because the software can’t be improved without your help and this way you don’t even have to report a bug as it’s done automagically!
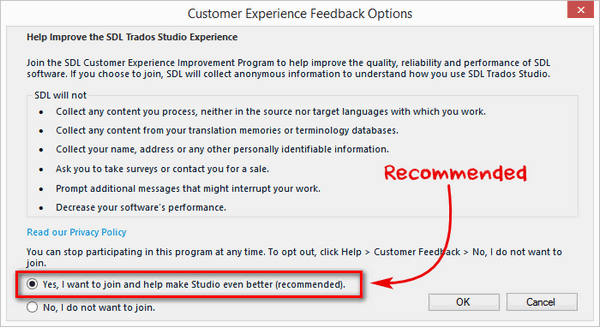
If you didn’t realise what this is for, or even if you just want to turn it on to reproduce a bug in the knowledge this will send SDL the report, then you can still join by going to the Help Ribbon in Studio and click on “Customer Feedback”… or just type feedback into “tell me” and you’ll get an idea of how “tell me” can be used to activate a menu item without having to navigate to it:

In fact even “tell me” benefits from the customer feedback option because anything you search for that doesn’t find a result is also reported back! This gives the SDL team an opportunity to continue to improve this feature to make sure it can find things based on what real users would type when looking for something. The Studio team, despite working hard on their super powers, still haven’t developed the ability to read minds but this could help get over that hurdle 😉 For example, my first attempt as I prepared this screenshot was to type “report a bug“, “bug“, “error message“, “error“, “support“… there was nothing found! I’m pretty sure these sorts of things should have a few results found especially in a release that has a focus on customer experience:
- customer feedback
- online help
- knowledgebase
- SDL Community
- where to go for customer support
- how to get customer support
I’ve documented them now and will check in subsequent updates to see how well they’re doing! But that’s all under the hood stuff, I also thought I’d list all the main features released in Trados Studio 2019 along with a short explanation of why it’s a good thing (in my opinion)… short because I figured I could write a separate article on anything I think would be helpful based on feedback in the future, and because I really didn’t intend to write so much!
Contents
- The Detail
- “Add files”
- “Update file”
- “New project wizard”
- “Verification settings at language level”
- “Restructured the online help”
- “Tell me what you want to do”
- “Useful Tips”
- “Improved importing of TUs to server based TMs”
- “Improved Regex handling”
- “Source and target text now displayed in verification reports”
- “Microsoft Visio file type support”
- “Enhanced navigation in the TM Maintenance editor”
- “Commit changes to TMs without further automatic search”
- “Disable using termbases for upLIFT Match Repair”
- “Changed some default options”
- “New option for PerfectMatch in regulatory flows”
- THE END
The Detail
“Add files”
The problem it solves
In previous versions of Studio if you wanted to add a new file to a project you would do something like this
- drag and drop the new file to the files view
- choose reference file or translatable file
- right cllick on the file that is now in the project and run an appropriate batch task
- select the target language from the navigation pane
Many users got stuck at number 3. or 4. because it was unintuitive to have to prepare the file and then move out of the source language when it was done. Now you can just “Quick Add File” and all of these steps are automatically completed so you are ready to translate the file. You can also use “Add files and run custom batch tasks” so there is a good degree of flexibility built in for sophisticated users too.
“Update file”
The problem it solves
If you start a translation project and then half way though it your customer regularly sends you updated source files as they are drafting the documentation at the same time as it’s being localized you’ll be able to relate to thiis one! The options in earlier versions of Trados Studio were to add the files with new names to the existing project using the method numbered 1 – 4 above; or create a new project with the updated files every time you receive them using Perfect Match (if you have the Professional Version) to apply the work you have done so far to the new file, or pre-translate from your Translation Memory if you have any other version.
The new “Update file” option in Trados Studio 2019 does away with these steps and replaces the old file in your project with the new one and uses Perfect Match whether you have the Professional Version or not. All that in a very smooth process that makes it easy to deal with source file updates at any stage of your translation project.
“New project wizard”
The problem it solves
Trados Studio has always had two basic ways to create a project, the single document workflow or a standard Studio project. Trados Studio 2017 introduced a drag and drop approach that simplified the steps but added some confusion because the single file process now drops everything into one ever increasing folder (as opposed to creating the project in the same folder as the source file). So then there were two single file approaches (the old way or the drag and drop), and a standard project which many users found complex as there too many steps.
The new project wizard supports the creation of a project, for one file or multiple files into a single step with all the appropriate settings in one window. It actually does a very good job of this because it clearly shows you the following:
- a metro map that can be used navigate the steps if needed and an indication of whether the resources in each stage are populated or not

- clear indication of which project template is being used and the ability to change it
- place to give the project a unique name
- a location path of the project which can be easily changed
- source and target languages
- files for translation
If you have Translation Memories and Termbases already in your default settings then that’s all you need… so you can actually create the project from this screen alone. So no more clicking through many steps of information you don’t even need and a very fast consistent method with an easy way to quickly navigate to any part of the creation process you would like to change. A very nice feature and I’d encourage all users to adopt this for all projects instead of the single file approach. That gives you complete flexibility to do whatever you wish with the projects in the future whether you use one file or not.
For me the single file approach is great for testing files and segmentation rules… a quick Ctrl+Shift+O and the file is open using whatever changed TM settings I’d applied. For translation work I’d use the wizard!
“Verification settings at language level”
The problem it solves
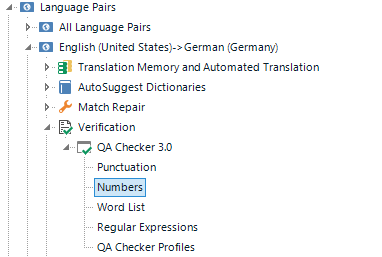 Not every user makes proper use of the verification settings in Studio… but if you do then this is a killer feature that is long overdue. Some of the options in here are very often language specific, things like punctuation, number handling, word lists, regular expression checks. There are other verification checks but they are probably less sensitive to language differences. All earlier versions of Studio applied the verification settings at a global level only. So this meant you needed to keep an export of your settings handy to be able to change them every time you worked in a different language by importing and overwriting the existing settings. This could be pretty painful on a 40+ language project with different settings for each language as you’d have to run the verification check 40+ times as well! And don’t think this is only for multilingal projects because it’s not. Even a translator working with a single pair, EN to DE and DE to EN for example can benefit by setting up the checks specifically for each direction.
The new feature allows you to create rules for each language pair and run a QA check across the entire project in one go. There is still a global settings available and this is the default. But you can apply changes to just one or more languages to have more control to suit your needs.
“Restructured the online help”
The problem it solves
This one is something I’d have overlooked if I hadn’t seen this comment from Mats Linder, author of the famous Studio Manual, so thank goodness he noticed! The technical documentation team have completed a mammoth task grouping the topics into three main user scenarios: translating, reviewing and project management. This has been done to help users better identify with the content and it also allows them to introduce more action-oriented instructions with more details than were previously provided in the quick start guides. So hats off indeed!
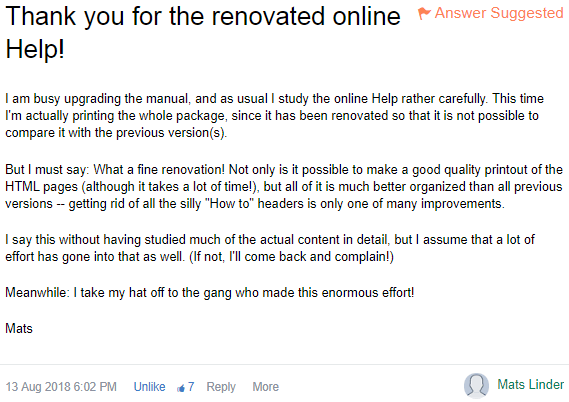
Sadly this experience is marred somewhat by the performance on the servers hosting the documentation. It can take over a minute to render a page when you click on the help… so thank goodness for the ability to download the help so it’s available to you offline for faster access when you need it!
“Tell me what you want to do”
The problem it solves
Essentially the clue is in the title, the new “tell me” feature allows you to type in something you need help with and it can do several things:
- give you a shortcut directly to the feature and save you navigating through the menu structure of the project settings, or file options
- point you to some additional help for a particular topic
This explanation makes it sound a little like “so what… a glorified help” and I’ve certainly seen enough comments saying the same thing from people who have not tried it. I’ve also seen a few similar comments from people who have tried it and are disappointed that it doesn’t have an answer to anything they type in. But on the flip side those users who approach it with an open mind and start to realise the potential “tell us” it’s really a very welcome feature for new users and advanced users alike. During the Beta I can tell you many users very quickly started to view this as their favourite new feature in Studio. So don’t underestimate the value you can get from this and play around with it as much as you can.
If you skipped the start of this article to get to these parts where I’m addressing the features then I’d recommend you wind back a little and review two things:
- The video and blog article I referenced at the start
- the section on customer feedback because the more you use “tell me” the better it’s going to get!
It’s also worth noting that “tell me” is localized into all the Studio user interface languages. So you can search in English or the language of your Studio interface to help you find the things you need.
“Useful Tips”
The problem it solves
The “Useful tips” feature is essentially context help on demand. As you use Studio the content of the tips pages change to show you short articles relevant to the part of Studio you are in. Whilst I think this is mainly aimed at new users to help them familiarise themselves with the features in Studio I’m sure there will be times when it could save you time trying to find information elsewhere.
“Improved importing of TUs to server based TMs”
The problem it solves
Something for GroupShare users… when importing a TMX to SDL Trados GroupShare this used to be done in chunks so you would have to wait for the entire file to be imported before you could use Studio for anything else. This is no longer the case and now the entire TMX file is imported to the server first which leaves you free to get on with your next task while the import is completed as a background process on the server.
“Improved Regex handling”
The problem it solves
There are two enhancements around this area and both relate to the use of regular expressions in the verification settings:
- Importing regex settings from other users or from your own backups now support merging as opposed to simply overwrite
- If you have very long lists of regular expression checks you can filter on them by the description, the RegEx source and the RegEx target
I think the implementation of both of these features could have been carried out in a more useful way, but nevertheless they are very welcome and they were a well voted for idea in the ideas site.
“Source and target text now displayed in verification reports”
The problem it solves
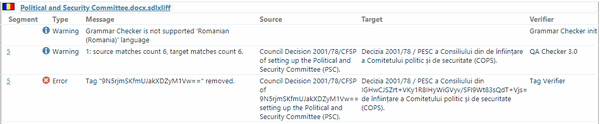
A long standing request ever since Trados Studio 2009, and in the ideas site, has been the ability to see the source and target segments in the verification reports. In earlier versions you can only see the error message a link to the bilingual file and the segment number. This meant that you needed to have the file open and then flick backwards and forwards between the report and the translation to see the context. The same problem applied to the QA Checker, Term Verifier and Tag Verifier results.
In Studio 2019 you have this ability which makes the reports far more useful when you share them with others:
“Microsoft Visio file type support”
The problem it solves
If you received Microsoft Visio files for translation your only options in earlier versions of Studio were to create a custom XML filetype to handle the contents of the unzipped visio file, or use one of the filetypes provided on the SDL AppStore which are not free (see below). Trados Studio 2019 introduces support for Microsoft Visio files as part of the program.
A great enhancement but worth noting the following:
- Trados Studio 2019: supports files created with Microsoft Visio 2016. It may support earlier versions but this is all it has been tested with.
- Sysfilter for Visio: supports Microsoft Visio 5 to 2016
- Microsoft Visio Filter for SDL Trados Studio: supports Microsoft Visio 2003, 2007, 2010 (VDX) and Microsoft Visio 2013 and 2016 (VSDX)
So this is a very useful addition, but don’t expect this to be the answer to all Visio files because it may not be.
The problem it solves
A personal favourite! If you had ever needed to show more than 50 Translation units at a time in earlier versions of Studio, or tried to get to the last Translation Unit you saved to your Translation Memory then you’ll know it was a ridiculously difficult thing to do, often requiring workarounds via a TMX editor.
In Trados Studio 2019 these problems have finally been addressed by adding the ability to navigate anywhere you like in the TM through a convenient set of functions right there in the TM maintenance interface:

Not a ground breaking feature that will change the way the translation industry works… but if you’re a Trados Studio user it’s an extremely welcome and useful piece of functionality.
“Commit changes to TMs without further automatic search”
The problem it solves
One of the “features” of earlier versions of Trados Studio was an automatic search after committing changes based on the last search you made. But if you no longer had anything in the TM relating to the search term you had to wait a while for the search to find no result and for a large TM this could take a while.
Trados Studio 2019 introduces a new option to disable the automatic search of the TM so you can now:
- Commit Changes and Re-Apply Search to have the same behaviour as before
- Commit Changes and Clear Search to commit the changes without automatically searching again
Welcome changes for anyone carrying out maintenance operations in the Studio TM Maintenance View.
“Disable using termbases for upLIFT Match Repair”
The problem it solves
The upLIFT Match Repair is a great feature introduced in Trados Studio 2017 but sometimes you want to be able to refine the results a little and not have some of your resources used to repair the match returned by the Translation Memory. Many translators today use very large terminology resources that are very helpful when working with them under the control of AutoSuggest for example, but not so helpful when your Translation Memory results are corrected on the basis of content in a termbase that you really only use for lookups and productivity gains. If the terminology is not completely approved then it’s too easy for an incorrect term to be used in a repaired fuzzy match.
Trados Studio 2019 introduces an option to choose whether your terminology is used as the source for upLIFT Match Repair or not.
“Changed some default options”
The problem it solves
There are a few things in earlier versions of Studio that were set as default options and the first thing experienced users did was change these options so that they could work with Studio in the way they preferred. The feedback SDL received on these things encouraged them to change the defaults so that all users were more likely to find the defaults satisfactory from the start. The full details of these can be found in the release notes in Studio but it would be these kind of things that are now default settings:
- enabled apply automated translation when no TM match is found (… this is apparently a bug in the release notes as the change should have been enabled everywhere but it was not implemented in the batch task options. So the behaviour is only changed in the Editor -> Automation options – thanks Mats for picking that up in the comments!)
- disabled perform automated translation lookup on confirmed segments
- enabled apply better match if found in TM after merging segments
- enabled process documents with unnaccepted or rejected changes for the MSWord 2000-2003 filetype
- disabled the extraction of notes in the MS PowerPoint 2007-2013 and 2007-2016 filetypes
- enabled extract contents of embedded excel charts and sheets in the MS PowerPoint 2007-2016 and MSWord 2007-2016 filetypes
- disabled “enable merging across paragraphs” when “Allow source editing” is selected in the General page of the new project wizard
“New option for PerfectMatch in regulatory flows”
The problem it solves
The whole idea of Perfect Match and a Translation Tool is to provide consistency with the latest correct translations. However, in Regulatory workflows this goes a step further and even inconsistent translations have to be preserved. Trados Studio 2019 adds an option to ignore inconsistent translations for regulatory documents.
THE END
Having got to the end of my article do I think it’s worth it? Putting aside my obvious bias, yes I do. Trados Studio 2019 may not be brimming with features that are going to change the way translators work with their translation tools, although “tell me” could be an exception to some extent, but there is easily enough in here to make me want to update based on the experience I have day to day working with users of the SDL translation solutions. So if you’re interested in my advice at all… upgrade and help SDL continue to improve the software in the future!
Awesome blog! A great addition to Emma’s awesome blog and Nora’s awesome video! Based on you three….I bought Studio 2019 yesterday. To me it’s a BMW/Mercedes of translation software! Many thanks to you three and the entire team of SDL Trados for a great software. (thanks for sharing the secret..why it is so good….psst….super powers!)
Thanks Guru… good to read you’re enjoying your software so much!
Dear Paul,
Thanks so much for this longish, valuable post! I found it very interesting. I really appreciate that you took the time to compile all of it!
Unfortunately, I was unable to participate actively in Beta testing due to a huge project we had to manage during the last months, but I tried to follow at least by reading!
I can certainly use some of the information found here for our oncoming BDÜ seminars, people are quite eager to know about Studio 2019 and often ask whether it’s worth it J. All in all, I find 2019 opens large files quicker than 2017, and I’m currently quite happy with it.
Thanks again!
Kind regards
Annette
Thanks Annette, I’m glad some of this information will be helpful and reused… makes it worth the effort of writing it! Good you’re getting on with 2019 too.
Hi Paul,
thanks for a great overview. I like the hands-on approach in the article with “the problem it solves”.
From a personal point of view, I’m thrilled to see features that I’ve been asking for from SDL for many years now: language-specific QA settings and source/target in the QA reports. With these two features available, we can do away with some of the workarounds we’ve had in place for many years now. 🙂
KR,
Andreas
Thanks Andreas, glad to read some confirmation of these features being something you, and I’m sure many others, have wanted for a while.
Hi Paul
Thanks for the article, it was very informative about Trados Studio 2019.
One question:
>disabled the extraction of notes in the MS PowerPoint 2007-2013 and 2007-2016 filetypes
I’m curious what feedback you received about this.
Does this mean most clients only want slides translated, but not the notes?
Hi Jesse, that would be correct. The feedback we have received suggest most translations of powerpoints are delivered to provide localized copies for information and the notes are not shared (maybe converted to PDF?). It doesn’t mean the notes are never localized, but it seems the option to extract the notes is considered more appropriate not being the default. Some customers, if they are going to be delivering the presentation in other languages will almost certainly want to see the notes localized.
One comment, one question:
Comment: I believe “Source and target text not displayed in verification reports” should read “Source and target text now displayed in verification reports”.
Question: “Commit changes to TMs without further automatic search” — The default when I click the button (without displaying the options list) reads “Commit pending changes to the Translation Memory”. Is that then the same as “Commit Changes and Re-Apply Search”, and if so, why not spell it out? Currently it seems as if there are three options, of which the first (default) one is not really specified in detail. Which is confusing.
Thanks Mats, I corrected the typo.
I found the answer myself, by using the Alt key shortcuts: The same shortcut (C2) is used for the default button/option as for the “Commit Changes and Clear Search” option. So my assumption was correct (as is your description). But it may still confuse people.
Or, actually, my assumption was wrong. That does not matter, of course. But maybe your description above should clarify what is what.
Hi Mats, I think the way the UI is displayed is correct. The button is for committing changes and this is what it does. If you have not made any search before using this then a different description would be even more confusing. But whether you made a search or not the description is still accurate. The drop down then provides you with the ability to select a different behaviour afterwards if you were searching the TM as part of your maintenance activities. The default is the way it always worked as this reduces the clicks when you are carrying out maintenance tasks… it re-applies the search.
Another observation: You say that “enabled apply automated translation when no TM match is found” is the default value. Not in my version; if I click Reset to default, this option is disabled.
Thanks for picking that up Mats. I checked with the product manager and apparently this work was planned but didn’t get completed in time… so the bug is actually in the release notes as they didn’t reflect the work that was actually completed for this release. The change was implemented in File -> Options -> Editor -> Automation but not consistently across the batch tasks too.
Hi Paul,
I am upgrading to Studio 2019 after reading your article! I didn’t go through it in detail (busy working on projects at the moment), but I trust your opinion and decided to take the plunge:)
In regards to the improved TM management in Studio 2019, I wonder if Studio 2019 would allow me to manually add new TUs to a TM I opened in TM management view. (Sorry if this was mentioned in your article) I am not talking about adding something from an existing project. I mean adding something totally new and related. Is it possible?
Chunyi
Hi Chunyi, enjoy 2019! On the adding of TUs to a TM ad-hoc… I think the only way to do this efficiently for now is using something like T-Windows.
I am sorry for my late reply, but I only just found this very useful article. Thanks Paul,
Has TB processing been improved. In particular the reliable finding of terms without repeated reorganisations?